How to use the theme?
Blogson Documentation
Download the child theme here. Only required when you are doing custom coding to add more features.
Step 1) Install and activate all the recommended plugins.
Step 2) Go to Appearance -> Import Demo Data.
Step 3) Choose Demo and Import.
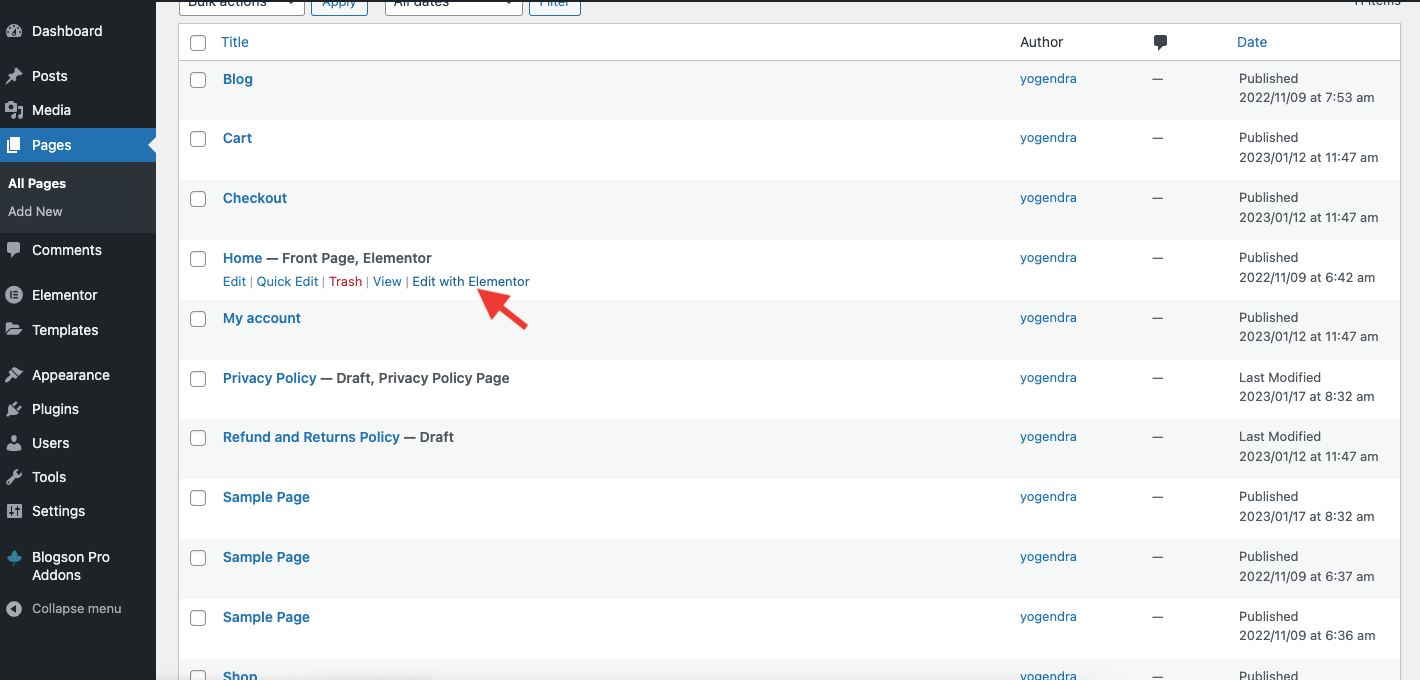
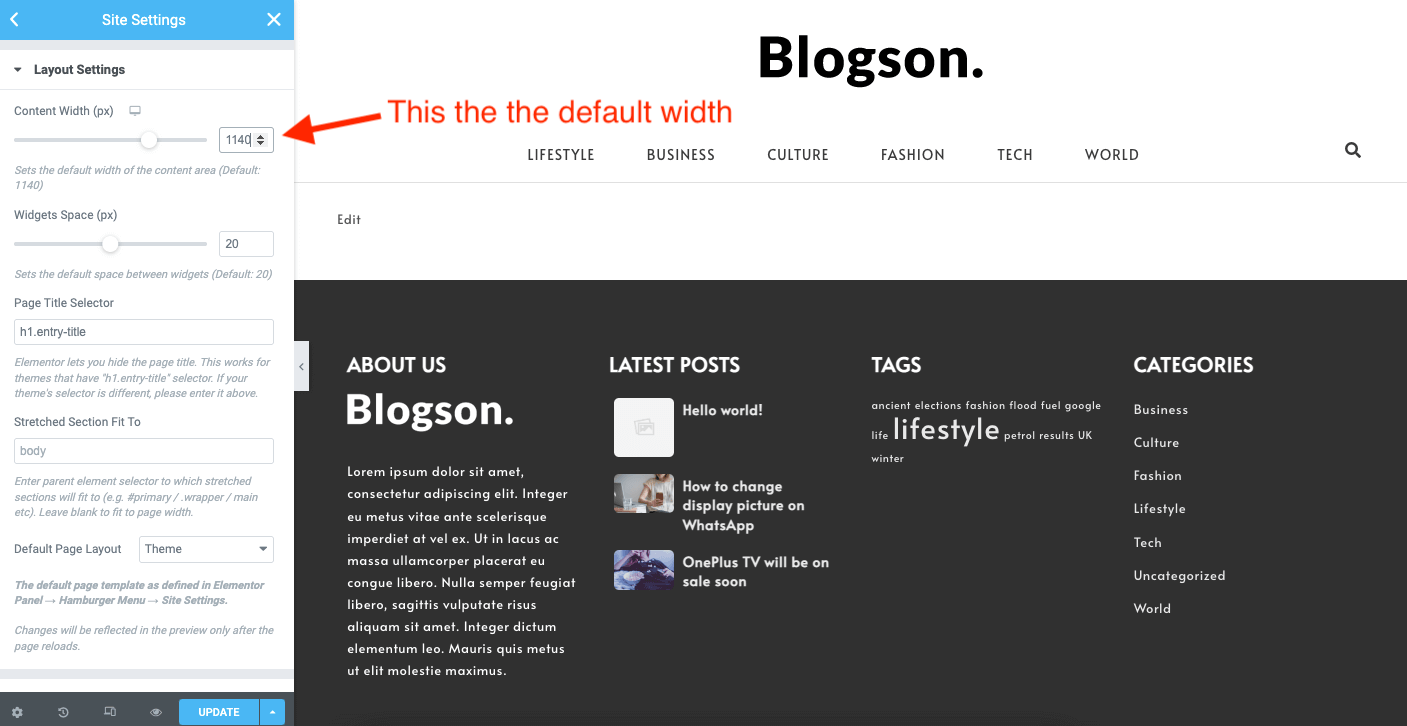
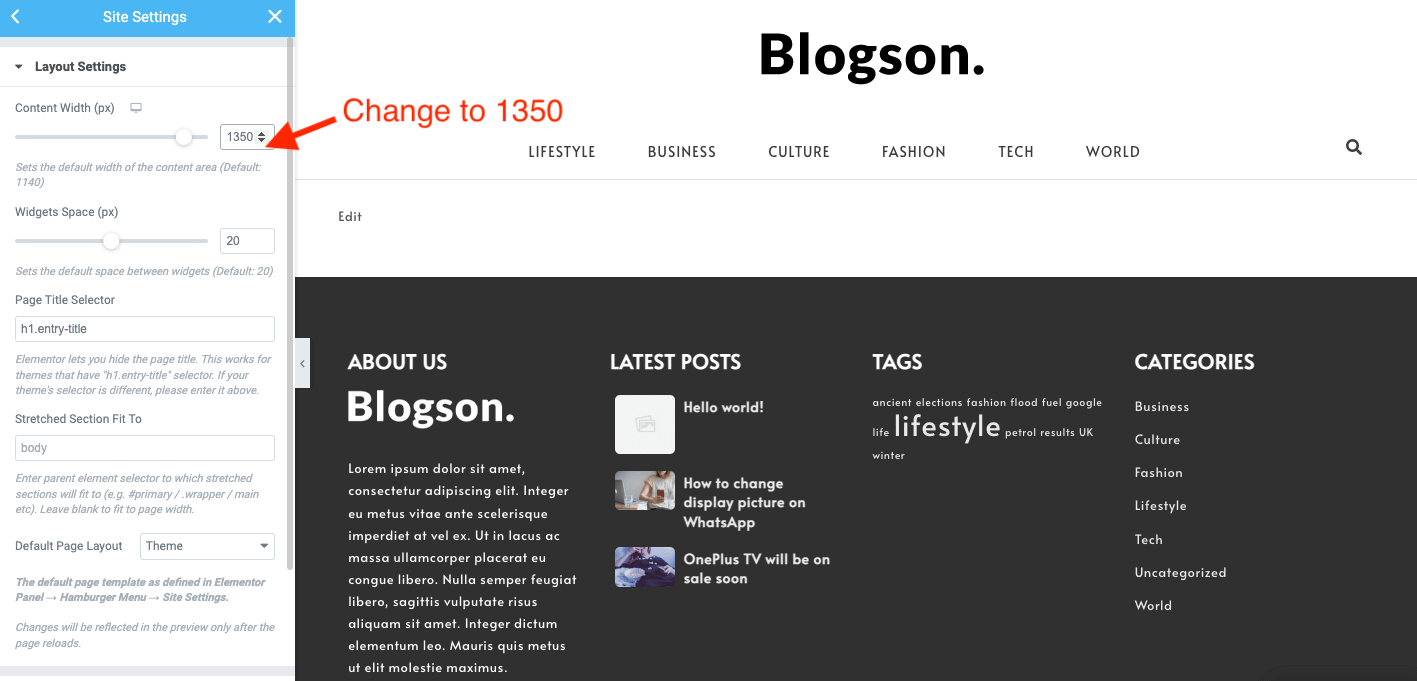
Step 4) After the demo import, open Home page with Elementor page builder and change the layout content width from 1140 to 1350px
After installling the theme, just click on the Get Started with Blogson button and follow the instructions.
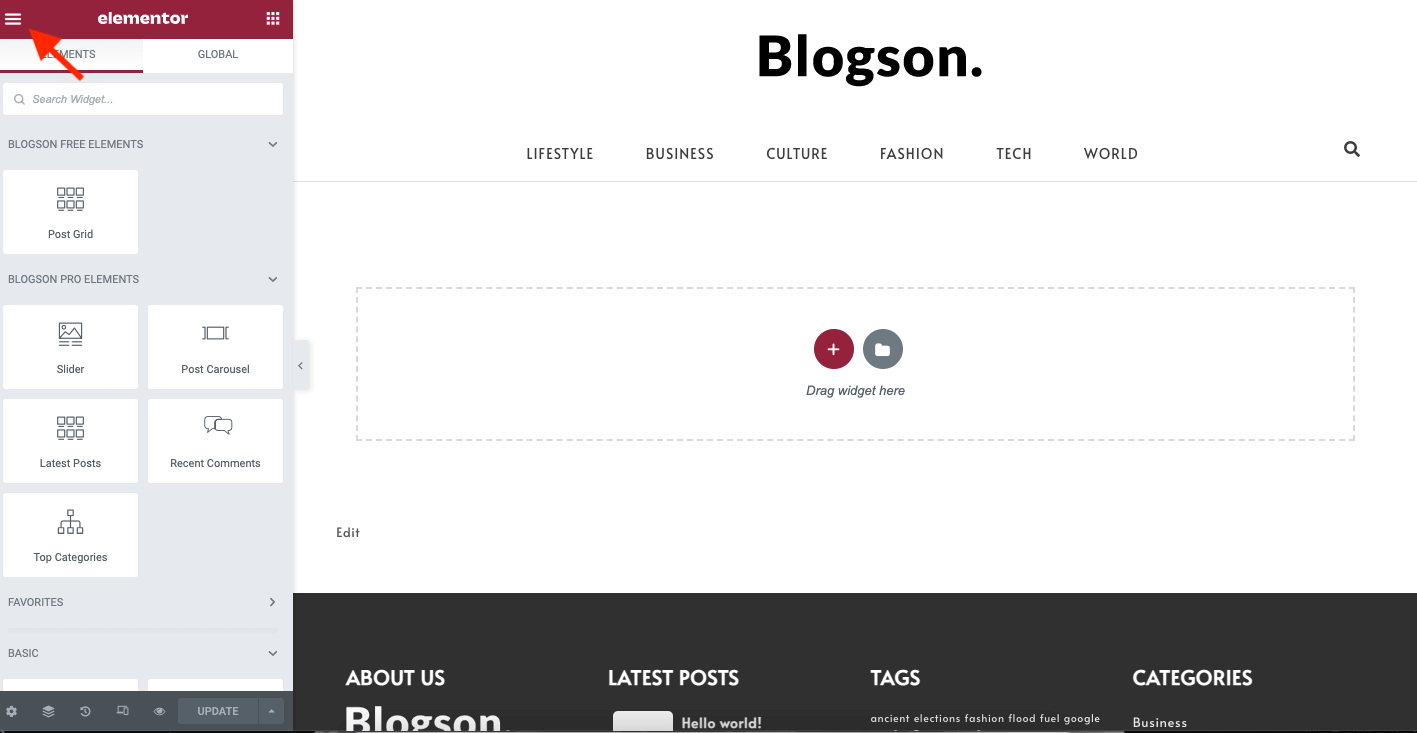
Step 2) Click on the top left icon
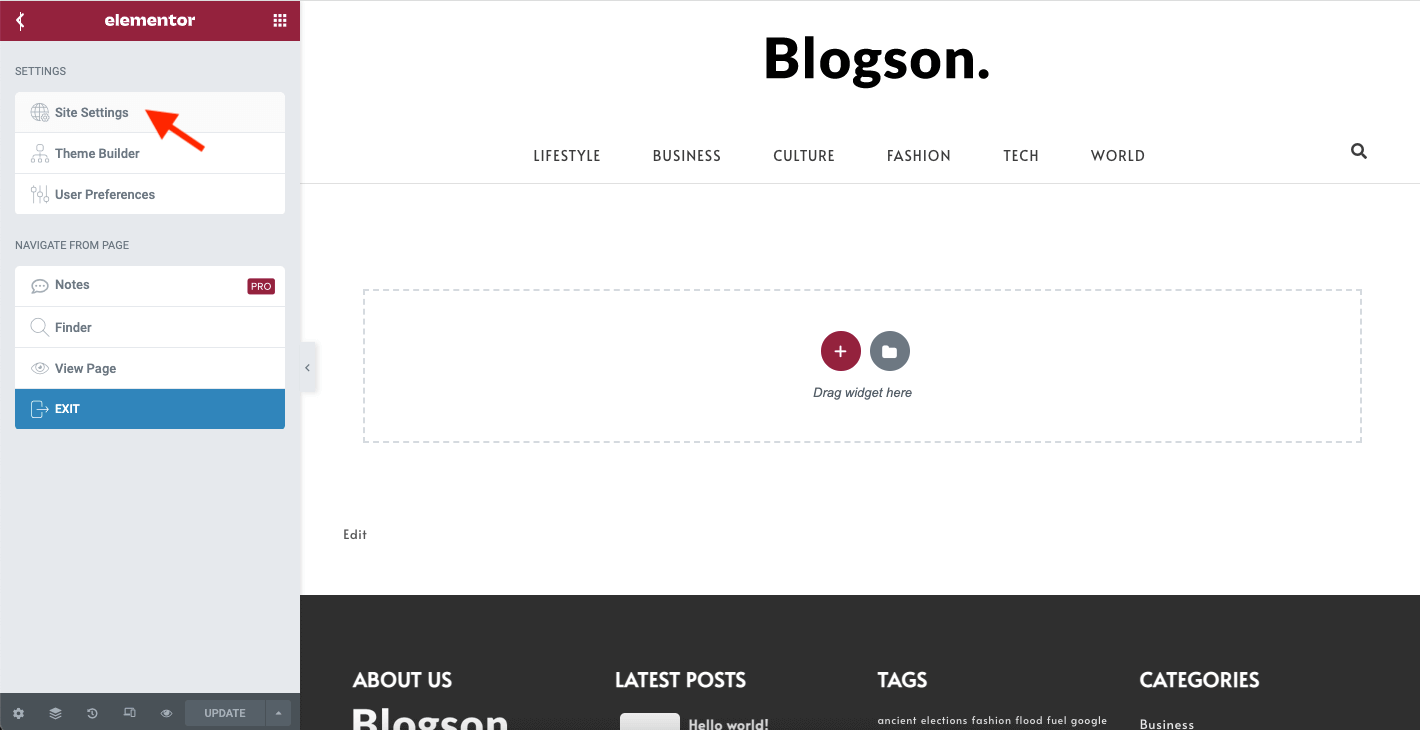
Step 3) Click Site Settings
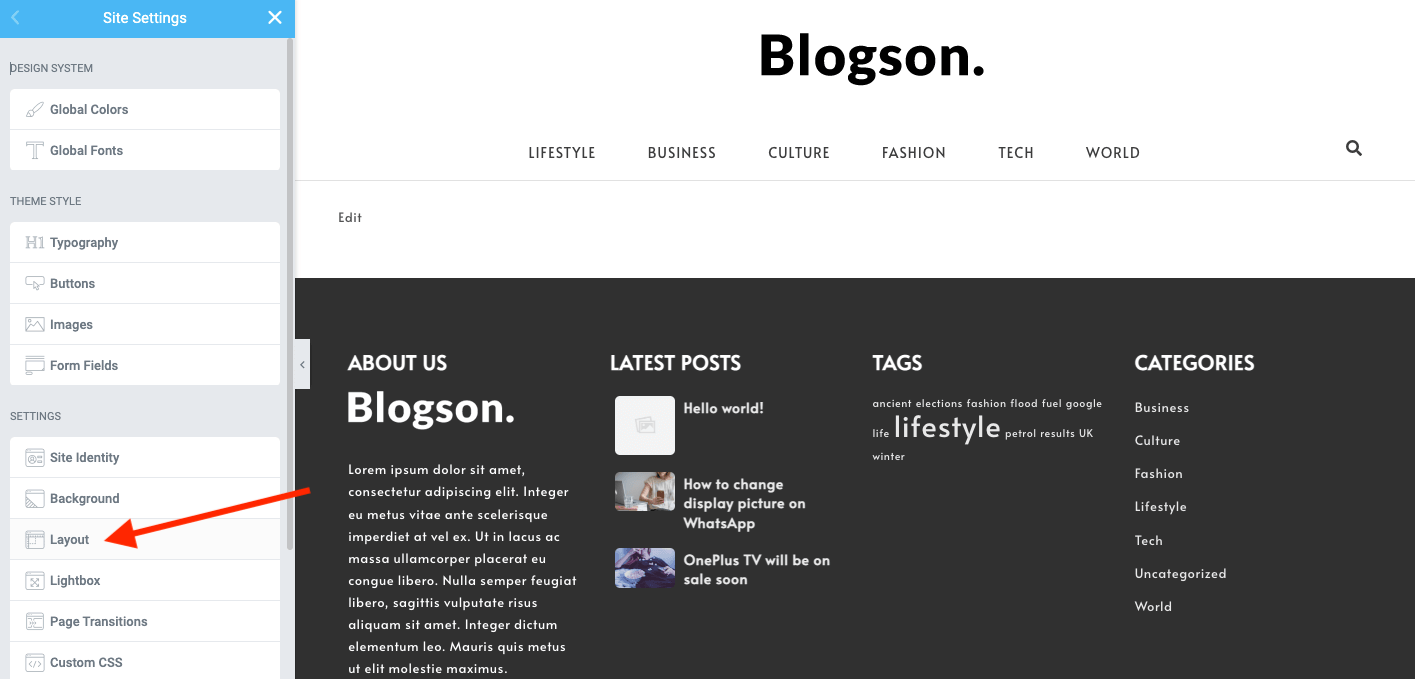
Step 4) Click Layout
Step 5) Now enter 1350 in place of 1140 and save
Step 1) Go to Appearance->Customize
Step 2) Click on Site Identity Tab.
Step 3) Upload a logo of your own.
Step 4) Save & Publish
Go to Menus from Appearance-> Menus.
Step 1) Create a new menu.
Step 2) Select pages from left and add it to menu
Step 3) After this Select Theme Locations Primary from bottom and click Save Menu
Step 2) Scroll down to Footer copyrights text
Step 3) Enter your content
Step 4) Save & Publish
Step 1) Click on Appearance -> Customize -> Preloader Settings
Step 2) Choose your settings
Step 3) Save & Publish
1) Twitter
Link Text: twitter.com
2) Facebook
Link Text: facebook.com
3) Github
Link Text: github.com
4) Linkedin
Link Text: linkedin.com
5) Instagram
Link Text: instagram.com
6) YouTube
Link Text: youtube.com
7) Behance
Link Text: behance.net
8) PInterest
Link Text: pinterest.com
Step 1) Go to Appearance -> Customize -> Blog Settings
Step 2) Choose settings and publish
Step 1) Go to Appearance -> Customize -> Additonal CSS
Step 2) Paste this CSS
.fa, .fas {
font-family: FontAwesome;
}
Step 3) Save & Publish
After your purchase you’ll receive an email regarding your purchase confirmation. You’ll also get the link for downloading the pro zip file and the license key. Once you get the zip file follow the steps below
Step 1) Go to Plugins -> Add New and then upload the zip file
Step 2) After upload install and activate the plugin. Upon activation it will ask for the license key, copy the license key from the email and paste it on the text field.
Step 3) Make sure you have the plugin Spiraclethemes Site Library installed and activated ( recommended plugin)
Step 4) Now you have 2 options ie Go for PRO demo import option or continue using the plugin without demo import. You’ll see new PRO options in the customizer. Change it accordingly.
For Demo import: Go to Appearance -> Import Demo Data and choose the demo
Step 1) Go to Appearance -> Customize -> Theme Style Settings (pro)
Step 2) Choose Dark Mode from the option
Step 3) Save & Publish
Step 1) Go to Appearance -> Customize -> Color Settings (pro)
Step 2) You’ll see the list of sections to choose and set colors. Customize the color and Save
Step 1) Go to Appearance -> Customize -> Blog Settings (pro)
Step 2) Enable Show Author Section and save
Step 1) Go to Appearance -> Customize -> Sticky Header Settings (pro)
Step 2) Enable Show Sticky Header and save
Step 1) Go to Appearance -> Customize -> Footer Settings
Step 2) Add your own copyrights text. Don’t leave blank.
Step 3) Go to Appearance -> Customize -> Footer Settings (pro) and disable Show Credit Link option
First of all open your page with Elementor page builder. Now on the left panel you’ll see BlOGSON PRO ADDONS block which have some PRO element widgets. Just drag and drop into the section where you want.
Step 1) Go to Appearance -> Customize -> Footer Settings (pro)
Step 2) Choose number of Footer Columns ie 1,2,3 or 4 columns footer.
Step 3) Now go to Appearance -> Widgets and put your widgets in the Footer Column1, Footer Column2, Footer Column3 or Footer Column4
Write a Review
Note: The images used in the demo are for demonstration purpose only. We recommend you to use your own images. Please check image copyrights before using an image.