What a Noindex Tag Is and Its Impact on SEO
The noindex tag is a meta tag placed in the HTML of a web page that instructs search engines not to index that specific page. This means that pages with a noindex tag will not appear in search engine results pages (SERPs). The noindex tag is commonly used in various situations, such as preventing indexing of duplicate content, avoiding indexing of certain administrative or backend pages, or keeping under-construction pages from being indexed.

However, while noindex tags serve a specific purpose, they can also have a significant impact on SEO if not managed correctly. If a noindex tag is accidentally applied to a page that you want to be visible in search results, it can severely limit the page’s potential to attract organic traffic. In this context, understanding how to remove noindex tags in WordPress is crucial for maintaining and enhancing your site’s search engine visibility. By removing unnecessary noindex tags, you ensure that all valuable content is accessible and indexable by search engines, thereby improving your site’s overall SEO performance.
Importance of Removing Noindex Tags for Improved Search Engine Visibility
Removing noindex tags from your WordPress site is essential for optimizing your search engine visibility. When pages that you want to rank are mistakenly tagged with noindex, they are essentially hidden from search engine crawlers. This oversight can prevent these pages from contributing to your site’s SEO and can reduce the overall traffic and ranking potential of your website.
Properly managing noindex tags is key to ensuring that your valuable content is indexed and ranked appropriately. By learning how to remove noindex tags in WordPress, you can rectify indexing issues and enhance your site’s presence in search results. This process not only helps in boosting individual page rankings but also improves the overall health of your site’s SEO strategy. In the following sections, we’ll guide you through the steps on how to remove noindex tags in WordPress, ensuring that your content is fully optimized for search engines.
Identifying Noindex Tags in WordPress
A. Checking Yoast SEO Settings (if Applicable)
Yoast SEO is one of the most popular plugins for managing SEO settings in WordPress, including noindex tags. To determine if Yoast SEO is adding noindex tags to your pages, follow these steps:
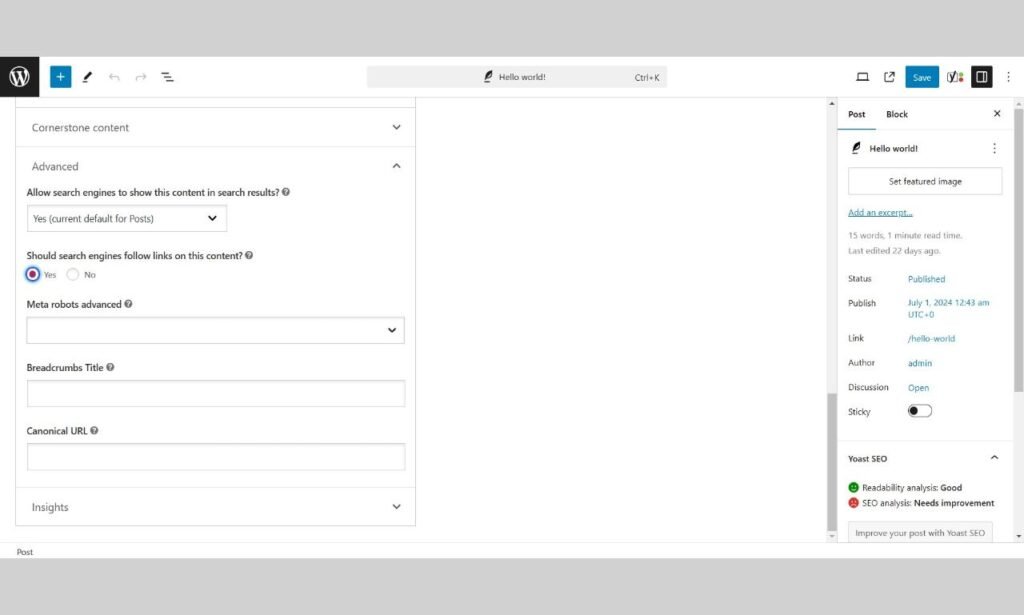
- Access Yoast SEO Plugin: First, log in to your WordPress admin dashboard. In the sidebar, locate and click on “SEO” to access Yoast SEO settings.
- Edit the Page or Post: Navigate to the specific page or post where you suspect a noindex tag might be applied. Open it for editing.
- Find Yoast SEO Meta Box: Scroll down below the content editor to the Yoast SEO meta box. Click on the “Advanced” tab within this meta box.
- Review Indexing Options: In the “Advanced” section, you’ll see options for search engine indexing. If the “Allow search engines to show this Page in search results?” option is set to “No,” it means a noindex tag is applied. To remove the noindex tag, change this setting to “Yes.”
Understanding how to remove noindex tags in WordPress using Yoast SEO ensures that your content is properly indexed and visible in search results.
B. Using the WordPress Reading Settings
WordPress offers a simple way to apply or remove noindex tags site-wide through its Reading Settings. To check and modify these settings, follow these steps:
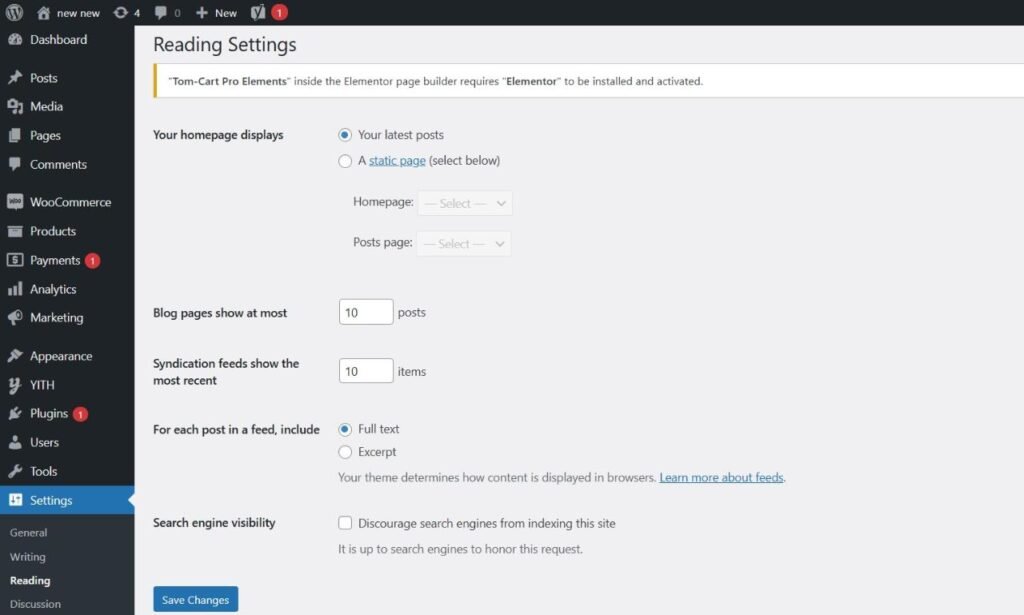
- Navigate to Reading Settings: In your WordPress dashboard, go to “Settings” and select “Reading.”
- Inspect Search Engine Visibility: Look for the option labeled “Search Engine Visibility.” If the checkbox next to “Discourage search engines from indexing this site” is checked, it means a noindex tag is applied across your entire site.
- Update the Setting: To remove this noindex tag from your entire site, uncheck the box next to “Discourage search engines from indexing this site.” This will ensure that your site is not unintentionally blocked from being indexed by search engines.
Knowing how to remove noindex tags in WordPress through the Reading Settings helps to ensure that all content on your site is accessible to search engines, improving your site’s visibility.
C. Inspecting the Page Source Code
For a more hands-on approach, inspecting the page source code can help you find and remove noindex tags manually. Here’s how to do it:
- Open Page Source: Go to the specific page in your web browser where you suspect a noindex tag might be present. Right-click on the page and select “View Page Source,” or use the shortcut (Ctrl+U on Windows, Command+Option+U on Mac).
- Search for Noindex Tags: Use the search function (Ctrl+F or Command+F) to search for the term “noindex.” Look for lines of code that contain <meta name=”robots” content=”noindex”>.
- Remove the Noindex Tag: If you find a noindex tag in the source code, you’ll need to go back to your WordPress editor. This may involve removing custom meta tags or adjusting settings in SEO plugins that insert noindex tags into your HTML.
Understanding how to remove noindex tags in WordPress by inspecting the page source code is crucial for ensuring that your valuable content is correctly indexed by search engines. This approach helps you troubleshoot and fix any indexing issues that may be affecting your site’s SEO performance.
How to Remove Noindex Tags in WordPress (Methods)
A. Method 1: Using Yoast SEO (Easy)
Yoast SEO is a powerful and user-friendly plugin that simplifies the process of managing SEO settings, including removing noindex tags. Here’s how to use Yoast SEO to remove noindex tags in WordPress:
- Access Yoast SEO Plugin: Log in to your WordPress admin dashboard. In the sidebar, find and click on “SEO” to access the Yoast SEO settings.
- Edit the Desired Page or Post: Navigate to the page or post where you want to remove the noindex tag. Open it for editing.
- Locate Yoast SEO Meta Box: Scroll down to find the Yoast SEO meta box below the content editor. Click on the “Advanced” tab within this meta box.
- Change Indexing Settings: In the “Advanced” section, find the “Allow search engines to show this Page in search results?” option. If it is set to “No,” change it to “Yes” to remove the noindex tag.
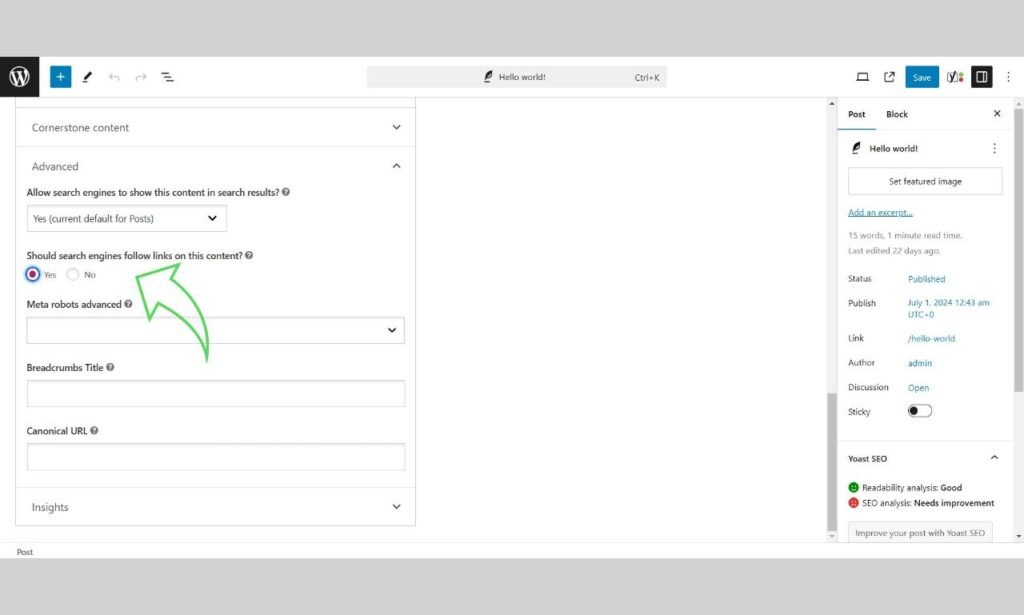
By following these steps on how to remove noindex tags in WordPress using Yoast SEO, you ensure that your content is properly indexed by search engines, improving your visibility.
B. Method 2: Editing WordPress Reading Settings (Easy)
WordPress provides a straightforward option to manage site-wide indexing through its Reading Settings. Here’s how to remove noindex tags using this method:
- Go to Reading Settings: In your WordPress dashboard, navigate to “Settings” and select “Reading.”
- Check Search Engine Visibility: Look for the “Search Engine Visibility” section. If the box labeled “Discourage search engines from indexing this site” is checked, it means a noindex tag is applied site-wide.
- Uncheck the Box: To remove the noindex tag, uncheck this box. This will allow search engines to index your site, enhancing its visibility.
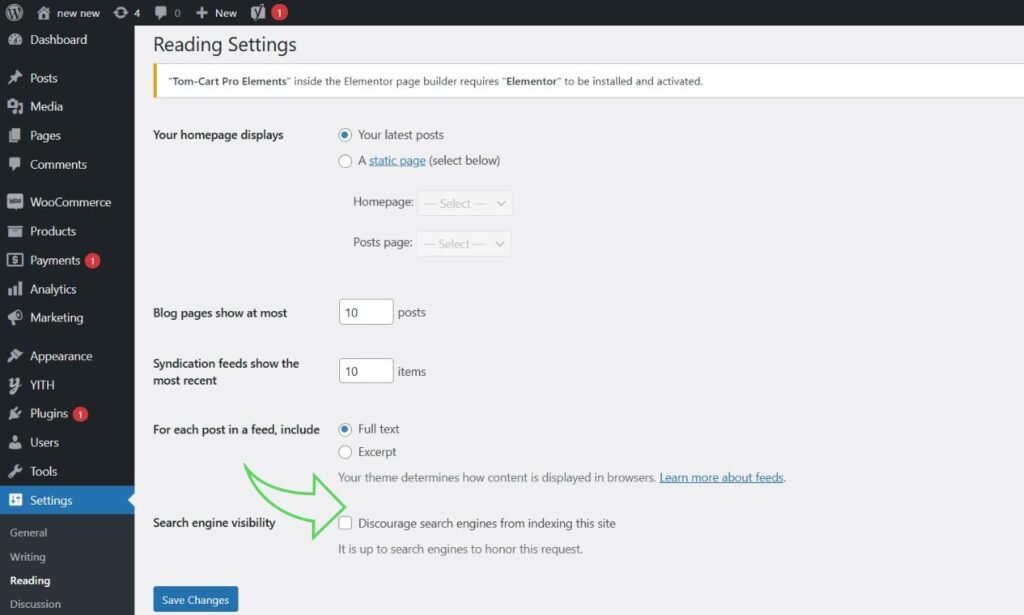
Understanding how to remove noindex tags in WordPress through the Reading Settings is essential for ensuring that your entire site is indexed by search engines, maximizing your potential for organic traffic.
C. Method 3: Removing the Tag from Theme Files (Advanced)
For more advanced users or developers, directly editing theme files can be necessary to remove noindex tags. Here are two options:
Option A: Deleting the Code Snippet from header.php
- Access Theme Editor: In your WordPress dashboard, go to “Appearance” and then “Theme Editor.”
- Open header.php: In the Theme Files section on the right, find and select header.php.
- Find and Remove Noindex Code: Look for any lines of code that include <meta name=”robots” content=”noindex”>. Delete these lines to remove the noindex tag.
- Update File: Click “Update File” to save your changes.
Option B: Adding a Custom Function in functions.php (for Developers)
- Open functions.php: In the Theme Editor, find and select functions.php.
- Add Custom Function: Add the following custom function to remove noindex tags programmatically:
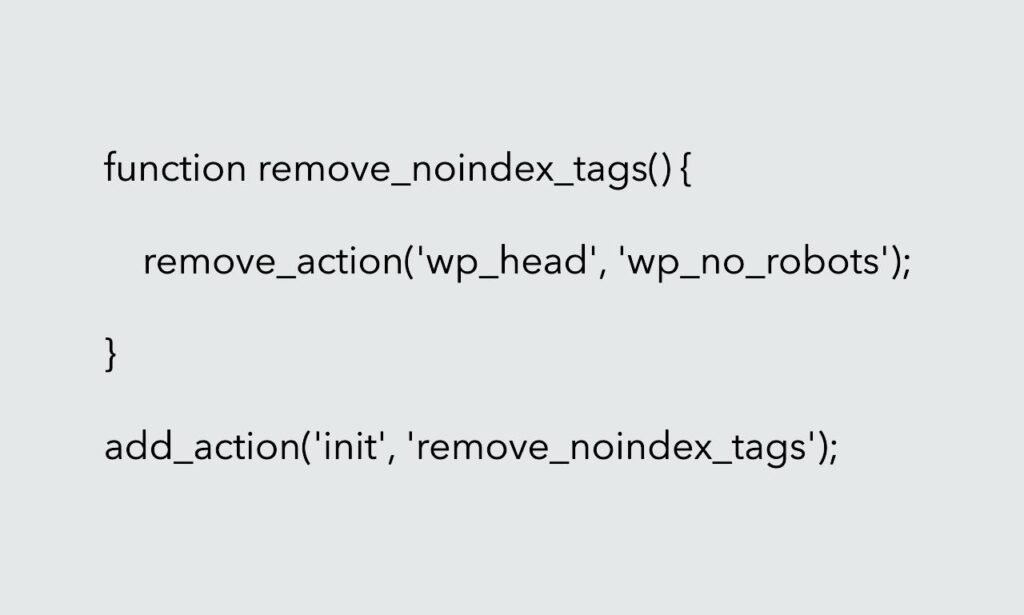
- Save Changes: Click “Update File” to save your changes.
By following these advanced methods on how to remove noindex tags in WordPress, you ensure that your site’s code is optimized for search engine indexing, improving its overall SEO performance.
Additional Tips and Considerations

A. Verifying Noindex Tag Removal with SEO Tools
After you’ve learned how to remove noindex tags in WordPress, it’s essential to verify that the changes have been implemented correctly. Proper verification ensures that your content is being indexed and can appear in search engine results. Here’s how you can do this effectively:
- Use Google Search Console: Google Search Console is a powerful tool that helps you monitor and maintain your site’s presence in Google Search results. Once you have removed the noindex tags, log in to your Google Search Console account. Navigate to the “Coverage” report to check the status of your pages. Submit your site for re-indexing to ensure Google’s crawlers revisit your pages and update their index status. Look for any remaining pages listed as “Excluded” due to noindex and take necessary action.
- SEO Audit Tools: Tools like Screaming Frog, Ahrefs, and SEMrush can crawl your website and provide detailed reports on your SEO health, including the presence of noindex tags. Perform a site crawl with these tools to identify any pages that still have noindex tags. This helps ensure that no pages are unintentionally excluded from search results.
- Inspect Page Source: Manually checking the page source is another reliable method. Open the page in your web browser, right-click on the page, and select “View Page Source” or use the shortcut (Ctrl+U on Windows, Command+Option+U on Mac). Use the search function (Ctrl+F or Command+F) to search for “noindex.” If the noindex tag has been successfully removed, it will not appear in the page’s HTML source code.
By verifying the removal of noindex tags using these SEO tools, you ensure that your efforts on how to remove noindex tags in WordPress have been successful and that your content is visible to search engines.
B. Understanding When to Use Noindex Tags
While learning how to remove noindex tags in WordPress is essential for optimizing your site’s SEO, it’s equally important to understand when it’s appropriate to use noindex tags. Strategic use of noindex tags can enhance your site’s SEO by controlling which pages are indexed. Here are some scenarios where applying noindex tags is beneficial:
- Duplicate Content: If your site has multiple pages with similar or duplicate content, using noindex tags on the duplicates can help prevent content cannibalization. This ensures that search engines focus on indexing and ranking the most relevant version of your content.
- Thin Content: Pages with little to no valuable content, such as tag archives or low-quality posts, should be noindexed. This prevents them from negatively impacting your overall site quality in the eyes of search engines.
- Private or Restricted Content: For pages that are intended for a specific audience or contain private information, applying noindex tags ensures they do not appear in search results. Examples include internal search results pages, admin pages, or members-only content.
- Staging or Test Pages: If you are working on a staging site or testing new features, applying noindex tags to these pages ensures they do not get indexed by search engines. This prevents unfinished or experimental content from appearing in search results.
By understanding when to use noindex tags, you can strategically manage your site’s SEO and ensure that only the most valuable and relevant content is indexed. This balance helps you maintain a strong SEO profile while controlling the visibility of specific pages.
Knowing how to remove noindex tags in WordPress and when to use them effectively ensures that your site is optimized for search engines, enhancing your site’s performance and visibility.
Conclusion
A. Importance of Managing Noindex Tags
Managing noindex tags in WordPress is a fundamental aspect of optimizing your website for search engines. Noindex tags control which pages search engines should not index, keeping them out of search results. While noindex tags can be beneficial for excluding duplicate content, thin content, or private pages, their misuse can severely hinder your site’s SEO performance.
Accidentally applying noindex tags to important pages can prevent them from appearing in search results, leading to missed opportunities for organic traffic. Therefore, understanding how to remove noindex tags in WordPress is crucial for ensuring that all your valuable content is indexed and visible to search engines. Regularly reviewing and managing noindex tags helps maintain a healthy SEO profile and ensures that your site’s content is appropriately accessible.
B. Benefits of Improved SEO Through Proper Indexing
Proper indexing of your website’s content is vital for improving your SEO and enhancing your site’s visibility in search engine results. When you know how to remove noindex tags in WordPress effectively, you enable search engines to crawl and index your entire site. This leads to several significant benefits:
- Increased Organic Traffic: By ensuring that all relevant pages are indexed, you increase the chances of these pages ranking in search results, which can drive more organic traffic to your site.
- Improved Search Engine Ranking: Properly indexed content helps search engines understand the structure and value of your site, which can lead to higher rankings for relevant search queries.
- Enhanced User Experience: When users find your content easily through search engines, it enhances their experience and satisfaction, leading to increased engagement and lower bounce rates.
- Comprehensive Online Presence: By making sure that all your important content is indexed, you build a comprehensive and authoritative online presence. This not only improves your site’s credibility but also helps in establishing your brand as a trusted source of information.
In conclusion, learning how to remove noindex tags in WordPress and managing them effectively ensures that your site is fully optimized for search engines. Proper indexing leads to better visibility, increased traffic, and improved overall SEO performance, contributing to the long-term success of your website.
Additional Services from Spiracle Themes
At Spiracle Themes, we understand that managing noindex tags is just one part of maintaining a successful WordPress website. Beyond helping you with how to remove noindex tags in WordPress, we offer a range of services to enhance your online presence:
- Website Creation: Whether you’re starting from scratch or need a redesign, our team can create a stunning, functional website tailored to your needs.
- Plugin Development: If you need custom functionality, we can develop plugins specifically for your existing website to extend its capabilities.
- Troubleshooting and Support: Encountering issues with your WordPress site? Our experts are here to help with troubleshooting and support to ensure your website runs smoothly.
If you have any questions or need assistance with your WordPress site or in our post focusing how to remove noindex tags in wordpress, feel free to contact us at Spiracle Themes. We’re here to help you achieve your online goals.
If you found this post helpful, please share it with others who might benefit from it. Have questions or need further assistance? Leave a comment below, and we’ll be happy to help!
What is a noindex tag?
A noindex tag is a meta tag used to instruct search engines not to index a specific page or post, preventing it from appearing in search results.
How can I remove a noindex tag from a WordPress page or post?
Yoast SEO: Edit the page/post, scroll to the Yoast SEO meta box, go to the Advanced tab, and set Meta Robots Index to Index.
All in One SEO Pack: Edit the page/post, find the All in One SEO settings, and uncheck the Noindex option.
Rank Math: Edit the page/post, go to the Rank Math meta box, and set Robots Meta to Index.
What if I can’t find the noindex option in my SEO plugin?
Check the plugin’s documentation or settings. Ensure you’re editing the correct page or post and that your plugin is up-to-date. Some plugins might have different menus or settings for managing indexing.
How do I remove noindex from my entire site?
Yoast SEO: Go to SEO > Search Appearance and under the General tab, make sure that the Show SEO meta box is enabled and set to index.
All in One SEO Pack: Go to All in One SEO > General Settings and ensure noindex is not applied site-wide.
Will removing the noindex tag immediately make my content appear in search results?
It can take some time for search engines to re-crawl and index your content. Removing the noindex tag does not guarantee instant appearance in search results; it depends on search engine crawling schedules.


