How to use the theme?
Prasoon Documentation
You can create your website like the preview demo in just few steps
Step 1) First of all install this theme by going to Appearance->Themes->Add New. Upload prasoon.zip or search prasoon in search bar and install it
Step 2) Install all the recommended plugins
Step 3) Go to Appearance->Import Demo Data
Step 4) You need to manually upload 3 files ie one for XML content, second one for widgets and third one for customizer. You can find demo files here.
Step 5) After demo import finish. You will see that your website looks like the demo preview site.
Note: You need to change the URL of the menu, as the imported menu will point to the demo site. You can change menus URL by going to Appearance->Menus
For eg: The menu will have URLs like this
http://prasoonwp.spiraclethemes.com/demo1/#home
You need to add your domain to the url like this
https://www.yourdomainname.com/#home
Note: You need to change the URL of scroll down button also. Navigate to Appearance->Customize->Scroll Down Settings and change URL
Step 1) Create a new page from Pages menu and name it Home.
Step 2) Select Template as Business Template from Page Attributes section. Publish it.
Step 3) Go to Settings->Reading menu and from Front page displays settings select A static page and then select Home as Front page.
Step 4) Save it
Step 1) Go to Appearance->Customize
Step 2) Click on Site Identity Tab.
Step 3) Upload a logo of your own.
Step 4) Save & Publish
Go to Menus from Appearance-> Menus.
Create a new menu.
Click on Custom Links to add menu items
1)To Add “HOME” Menu
Enter url : yourdomainname.com/#home For eg : http://www.prasoon.com/#home
Add Link Text : HOME
Then Click Add to Menu
2) For every other section. You need to know the particular section name. For this go to
a) Appearance -> Customize -> Widgets -> Business Template
b) Click on Add a widget button
c) When selecting prasoon widgets you will see section name in widget description. Copy the section id name. for ex: Section id: about. Copy the id name ie “about” in this case.
d) Go to menu again and click on custom links and add url like this yourdomainname.com/#about.
e) Add Your Link text.
f) Link other sections like this to menu
After this Select Theme Locations Primary from bottom and click Save Menu
Step 1) Click on Appearance -> Customize -> General Settings
Step 2) Scroll to Home Background Image
Step 3) Upload Image and save
Step 1) Click on Appearance -> Customize -> General Settings
Step 2) Scroll to Heading Text
Step 3) Enter heading in Heading Text section, Enter subheading in Sub Heading Text section, and so on
Step 4) Click Save
Step 1) Go to Appearance->Customize->General Settings
Step 2) On scroll down, you will see options to add 2 buttons.
Step 3) Add the url in Button URL if you want to add video on button click. For eg : https://www.youtube.com/watch?v=VZ9MBYfu_0A
Step 4) Click Save & Publish
Step 1) Go to Appearance -> Customize -> General Settings
Step 2) At bottom, you will see Enable Parallax scroll
Step 3) Click on Yes
Step 4) Save & Publish
Step 1) Click on Appearance -> Customize -> Widgets -> Business Template
Step 2) Click on Add a widget button
Step 3) Scroll down to Prasoon: About Section and click
Step 4) Enter content and Save
Step 1) Go to Appearance->Customize->Widgets->Business Template.
Step 2) Click on Add a Widget button at bottom
Step 3) Select Prasoon: About Style 2 Section
Step 4) Go to the skills section
Step 5) Enter skill content
Step 6) Save & Publish
Step 1) Go to Appearance->Customize->Widgets->Business Template.
Step 2) Click on Add a Widget button at bottom
Step 3) Select Prasoon: Features Section
Step 4) Add content
Step 5) Save & Publish
Step 1) Click on Appearance -> Customize -> Widgets -> Business Template
Step 2) Click on Add a widget button
Step 3) Scroll down to Prasoon: Services 3 Column Section for 3 columns icons or Prasoon: Services 4 Column Section for 4 columns icons and click
Step 4) Enter content for each of the blocks
Step 5) For “Font Icon” use fontawesome code for e.g. fa-envelope
Step 6) Save & Publish
Note: You can add any number of Service Rows of having 4 or 3 columns (depending upon the widget) in each row.
Step 1) Go to Appearance->Customize->Widgets->Business Template.
Step 2) Click on Add a Widget button at bottom
Step 3) Select Prasoon[New]: Testimonial Section
Step 4) Select your background image
Step 5) Add number of posts you want to see for ex 5
Step 6) After adding a number you need to click on Apply button on bottom of widget. You will see 5 blocks of testimonials.
Step 7) Add content to each of them and click on apply button on bottom of widget
Step 8) Wait for the customizer to preview
Step 9) Click on Save & Publish button on top
Note: You can also delete the blocks by entering a number lower than the entered one. for eg 3. This will delete the extra 2 blocks and their content and will show only 3 blocks from top.
Step 1) Go to Appearance->Customize->Widgets->Business Template.
Step 2) Click on Add a Widget button at bottom
Step 3) Select Prasoon: Portfolio Section
Step 4) Add Your Heading & Subheading
Step 5) Add Number of Portfolio Items for ex 12
Step 6) After adding a number you need to click on Apply button on bottom of widget. You will see 12 blocks of Portfolio Items.
Step 7) Enter content for each of the blocks.
Step 8) Save & Publish
Note: You can also delete the blocks by entering a number lower than the entered one. for eg 10. This will delete the extra 2 blocks and their content and will show only 10 blocks from top.
Step 1) Go to Appearance->Customize->Widgets->Business Template.
Step 2) Click on Add a Widget button at bottom
Step 3) Select Prasoon: Call to Action Section
Step 4) Add content like background image, heading, subheading button etc. You can even add parallax effect on it.
Step 5) Save & Publish
Step 1) Go to Appearance->Customize->Widgets->Business Template.
Step 2) Click on Add a Widget button at bottom
Step 3) Select Prasoon: Team Section
Step 4) Add Heading and Subheading. You can only add 4 team members in free version.
Step 5) Save & Publish
Step 1) Go to Appearance->Customize->Widgets->Business Template.
Step 2) Click on Add a Widget button at bottom
Step 3) Select Prasoon: Clients Section
Step 4) Add Heading and Subheading
Step 5) Add number of clients for ex 7
Step 6) After adding a number you need to click on Apply button on bottom of widget. You will see 7 blocks of clients.
Step 7) Simply select image for each block.
Step 8) Save & Publish
Note: You can also delete the blocks by entering a number lower than the entered one. for eg 5. This will delete the extra 2 blocks and their content and will show only 5 blocks from top.
Step 1) Click on Appearance -> Customize -> Widgets -> Business Template
Step 2) Click on Add a widget button
Step 3) Scroll down to Prasoon: Blog Section and click
Step 4) Enter content and Save
Step 1) Go to Appearance->Customize->Widgets->Business Template.
Step 2) Click on Add a Widget button at bottom
Step 3) Select Prasoon: Counters Section
Step 4) Add content.
Step 5) You can also add parallax effect to it.
Step 6) Save & Publish
Step 1) Click on Appearance -> Customize -> Widgets -> Business Template
Step 2) Click on Add a widget button
Step 3) Scroll down to Prasoon: Contact Section and click
Step 4) Enter content and Save
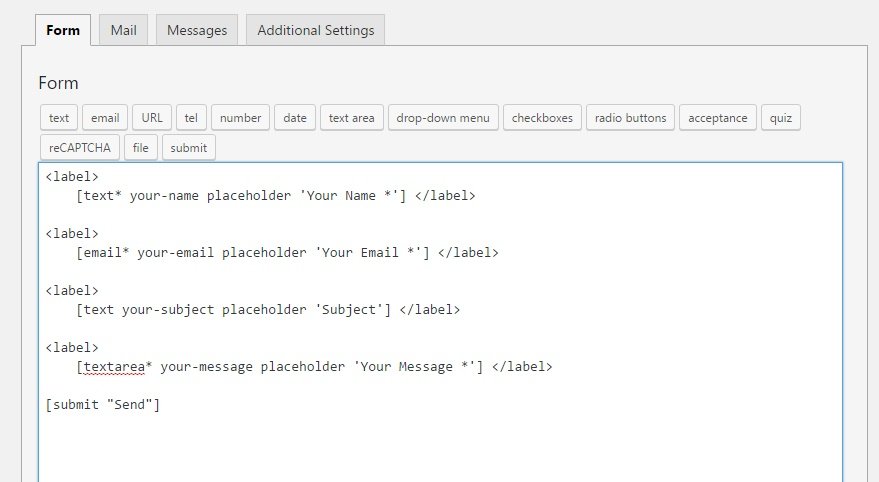
Step 1) Click on Contact -> Add New
Step 2) Create your new form or you can use our form
Step 3) Copy the shortcode
Step 4) Click Appearance -> Customize -> Widgets -> Business Template
Step 5) Add this shortcode in Prasoon : Contact Section
Step 6) Save & Publish
Step 1) Click on Appearance -> Customize -> Widgets -> Business Template
Step 2) Click on Add a widget button
Step 3) Scroll down to Prasoon: Contact Section and click
Step 4) Enter Icons content. For e.g. fontawesome code and url
Step 5) Save & Publish
Note: You can find your font awesome icon from the url below
Get Fontawesome Icons
Step 2) Scroll down to Footer copyrights text
Step 3) Enter your content
Step 4) Save & Publish
Step 2) You will see your section widgets
Step 3) Drag up or down your widget to reorder your section.
Step 4) Click on Save & Publish button on top
Step 5) Make sure you also reorder your menu after changing section
Step 2) Change your settings in Enable Sticky Header Feature
Step 3) Save & Publish
Step 1) Click on Appearance -> Customize -> Fonts Settings
Step 2) From here you can change Body fonts, Headings fonts, Body font size and headings font size
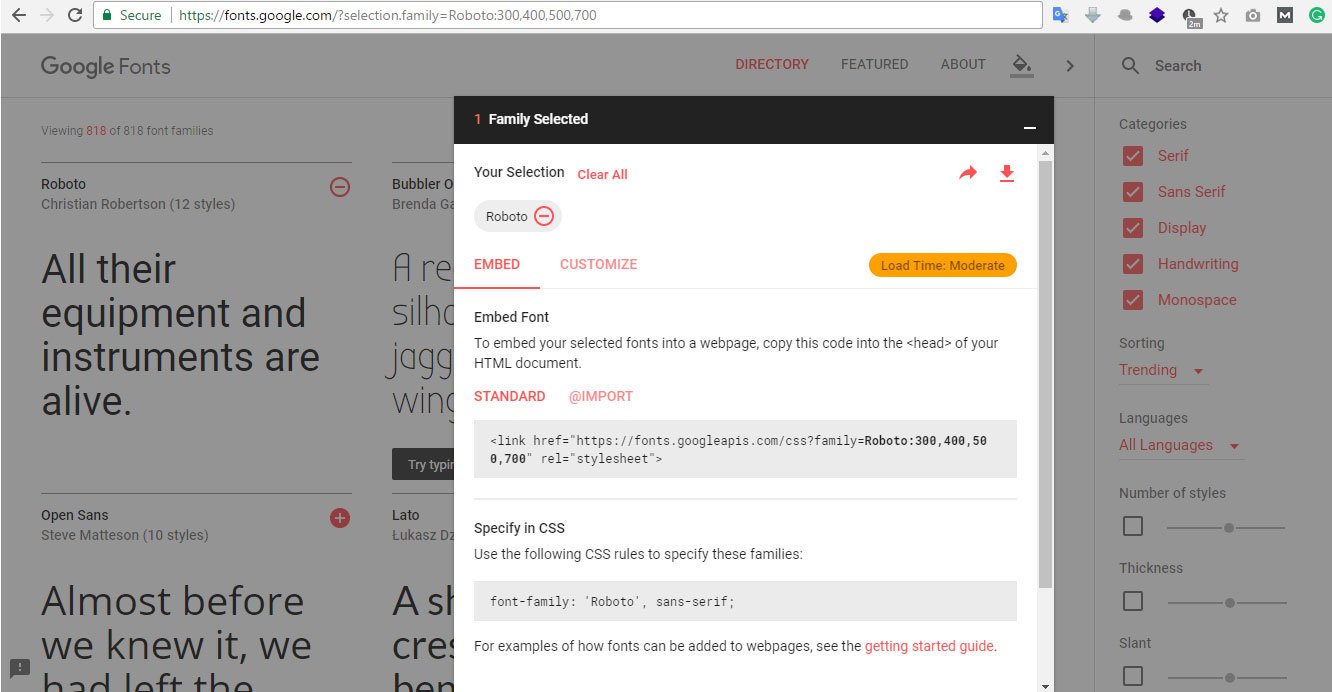
Step 3) To Add fonts simply go to
Google Fonts
Step 4) Select a font from there for eg Roboto

Step 5) Now copy the family part eg. Roboto:300,400,500,700 and paste in the Font Name for eg Body Font Name or Headings Font Name
Step 6) Copy the CSS rules under Specify in CSS and paste in Font Family (Body Font Family or Headings Font Family)
For eg Roboto, sans-serif
Note: Do not include the quote and semicolon while copying it
Step 7) Save & Publish
Step 1) Click on Appearance -> Customize -> Preloader Settings
Step 2) Choose your settings
Step 3) You can also upload a preloader GIF image.
Step 4) Save & Publish
For this, you need to have a blog page first. Go to Pages->Add New and create a page.
Now go to Settings->Reading and under Front page displays set Posts page your newly added page and save. Now you can follow these steps to change blog styles
Step 1) Go to Appearance->Customize
Step 2) Click on Blog Styles
Step 3) Select a style from 3 different styles
Step 4) Save & Publish
Section ID’s are important. They will help us to link to menu for smooth scrolling. You can find section id by following these steps
Step 1) Go to Appearance->Customize->Widgets->Business Template
Step 2) Click on Add a Widget
Step 3) Scroll down to prasoon widgets. You will see that the section id is mentioned there. For eg Prasoon: Blog Section You will see its id is mentioned as blog
Step 1) Click on Appearance -> Customize -> Slider Settings
Step 2) Next choose Slider Images from the options
Step 3) Save & Publish
Step 4) Click on Appearance -> Customize -> Widgets->Business Template
Step 5) Click on Add a widget button
Step 6) Scroll down to Prasoon: Slider Section and click on it
Stp 7) Drag the Prasoon: Slider Section widget to the top as the slider section is the first section we want to show
Step 8) Enter content
Step 9) Save & Publish
Note: The images used in the demo are for demonstration purpose only. We recommend you to use your own images. Please check image copyrights before using an image.