Whenever it comes to targeting the worldwide audience, a multilingual website plays a very important role. Many of you might not be familiar with this term. In this article, we will talk about what a multilingual website is and how to create it with the help of the WordPress Multilingual plugin (WPML). After reading this article, you will be able to create a multilingual website for your business without requiring any assistance from a web designer.
What is a Multilingual Website?
A multilingual website, as the name suggests, is a website that is available in multiple languages. In this increasingly connected world, the trend of creating multilingual websites is becoming more common and popular. Why? Brand visibility plays a major role in the success of any business, especially for new companies. You cannot expand your business by setting up operations in your home country only. Every successful brand or company has multiple branches in another part of the world. And this is just to increase business growth. By opening branches in other countries, not only will you get more new customers but also give your brand global recognition.
In the same way, if you have a website and you want to target customers all around the world, you should have a multilingual website. Having a multilingual website will show your customers that you care about them and you are culturally sensitive. They will surely appreciate your efforts you are putting to make them understood about your business or brand through a multilingual website. Additionally, having a multilingual website means you are telling the world that you have an international audience, thus making a positive impact on your business.
How to Create a Multilingual Website?
If you are using a WordPress website, it is very easy to turn it into a multilingual website. If you are planning to create a new website or a multilingual website, then I would suggest you choose WordPress. In one of the previous articles, we have already discussed why WordPress is better than other CMS. Now when you are ready with your WordPress website, the question is – how to create a multilingual website. Many of you might be thinking about creating multiple subdomains for your WordPress website so that later you can install one language for each of the subdomains. This method might sound useful, but it is too much hassle. Setting up multiple subdomains and managing them may require a lot of time, manual efforts, and a high cost as well. So you should avoid this method, and instead, choose a WordPress translation plugin.
WordPress Multilingual Plugin
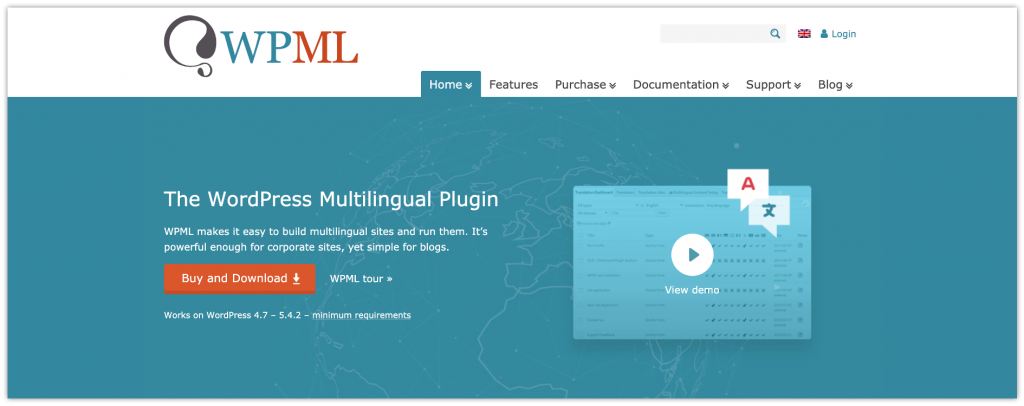
The WordPress plugin directory has a wide range of plugins for various purposes. If you are looking for something to translate your website, the directory has multiple plugins for this purpose too. WPML plugin is one of them, and perhaps the best WordPress translation plugin.
Whether you have a small blog or a big corporate website, the WordPress Multilingual plugin (WPML) understands the translation needs of any website. This WordPress translation plugin can easily translate the web content into more than 40 languages. Remember, it is not a free plugin, you will need to purchase it. The license price ranges between $29 and $195. There might be some free options as well, but believe me, this one is the most comprehensive option to translate web content. And that is why more than 400,000 websites are using this WordPress translation plugin.
How to Use WordPress Multilingual Plugin?
First, you need to install the WordPress Multilingual plugin and then activate it. Once the plugin is activated, you need to configure it before you can start using it.
Configure WPML Plugin
Step 1: On the top of your WordPress dashboard screen, you will see a notification box with a button – Configure WPML. Click it to start the configuration.

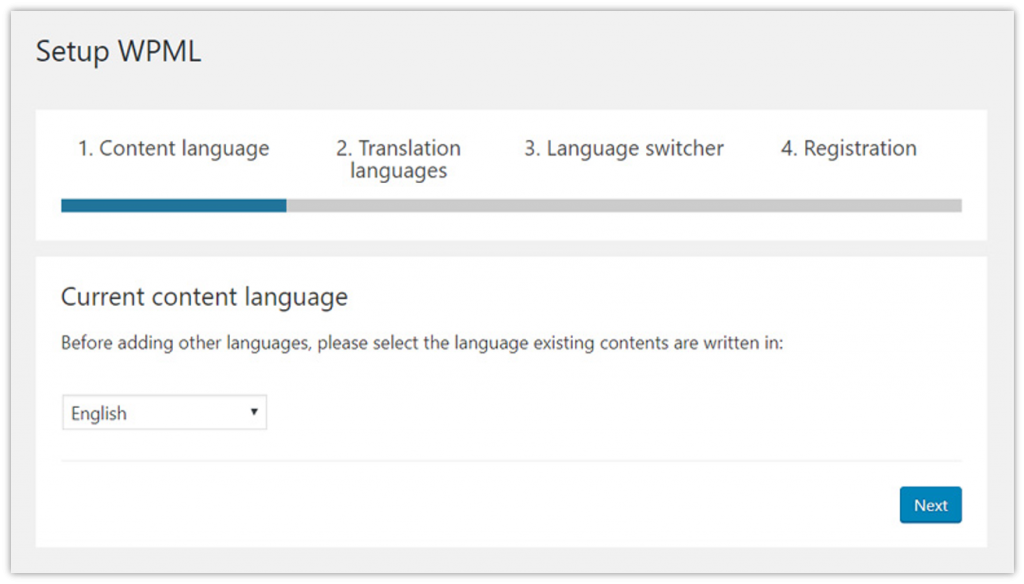
Step 2: The Setup WPML wizard will appear. The WPML plugin will detect your website’s language (you can change it if desired). Click Next.
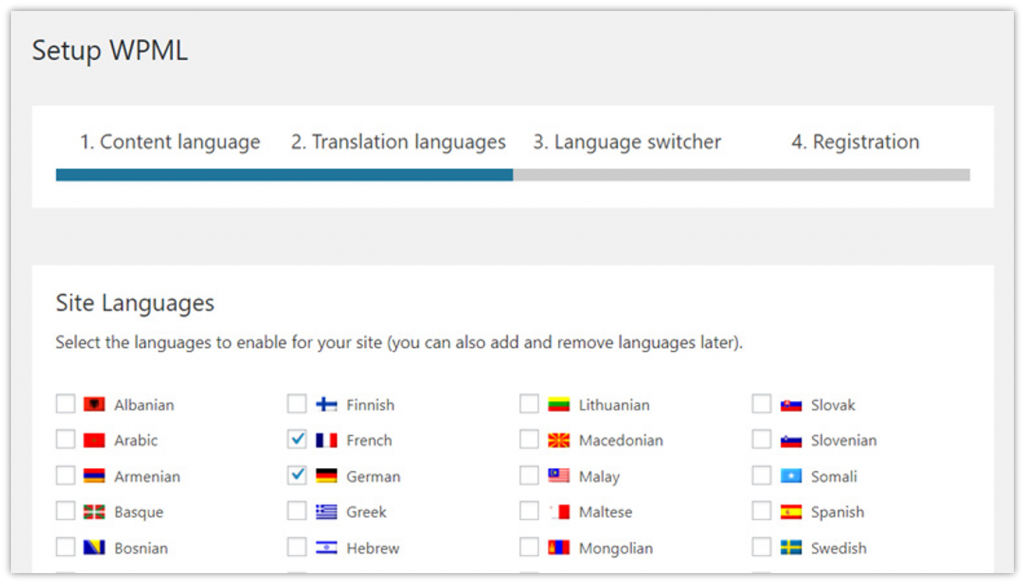
Step 3: Now select the languages that you want to enable. Remember, you can add or remove the languages later if desired. Click Next.
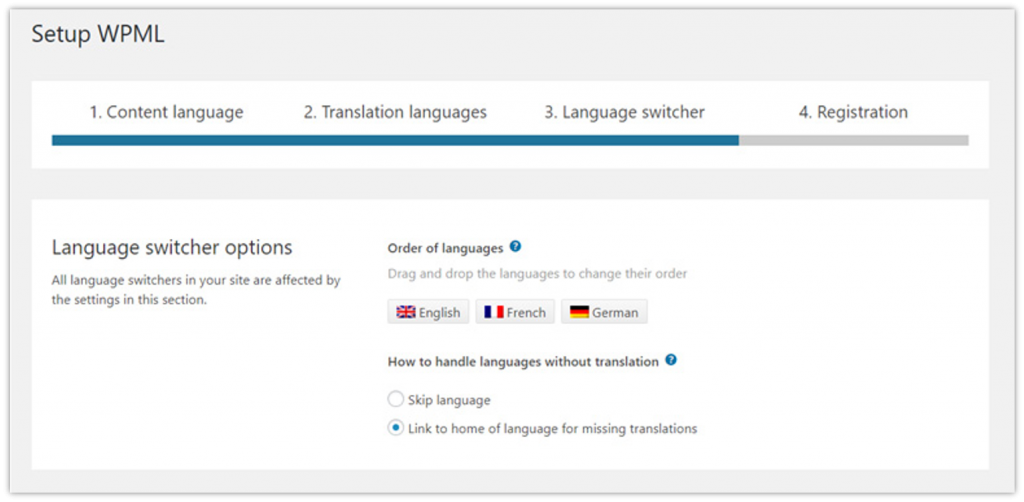
Step 4: On the Language switcher tab, select the language switcher options. You can define the order of languages.
Step 5: Right underneath this, there are multiple options to add a language switcher. You can add the language switcher either to your navigation menu, widget area, or footer area. Also, you can add links to the translation of posts. Click Add a new language switcher to a menu.
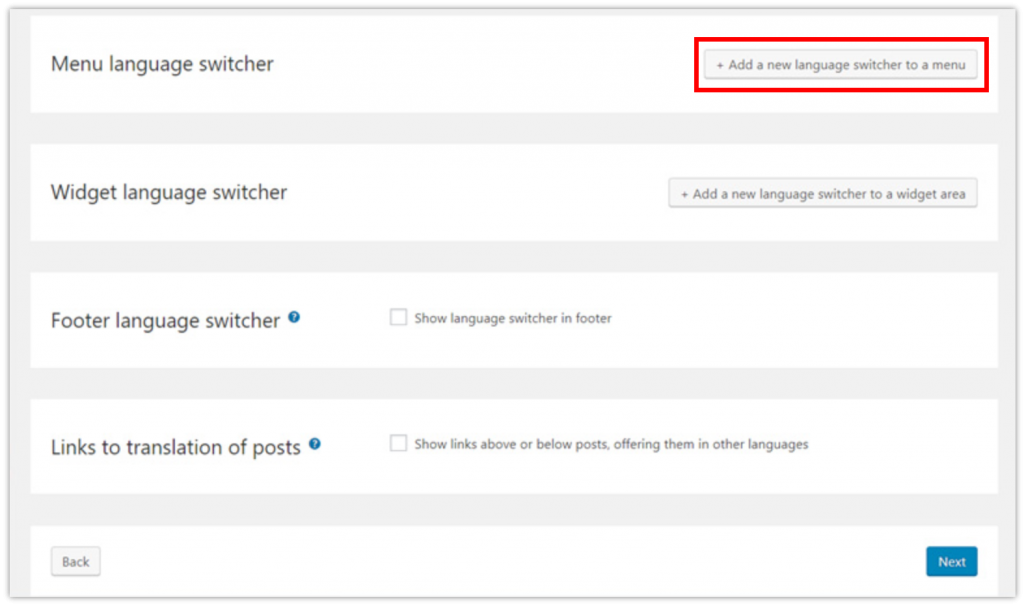
Step 6: On the New Menu Language Switcher pop-up screen,
- Choose a menu to show the language switcher. Also, set its position, i.e. show it as the first or last menu item.
- Then choose the language menu items style, i.e. show it as a dropdown menu or a list of languages.
- Now choose the items that you want to include in the language switcher.
- The last option is choosing the language switcher colors.
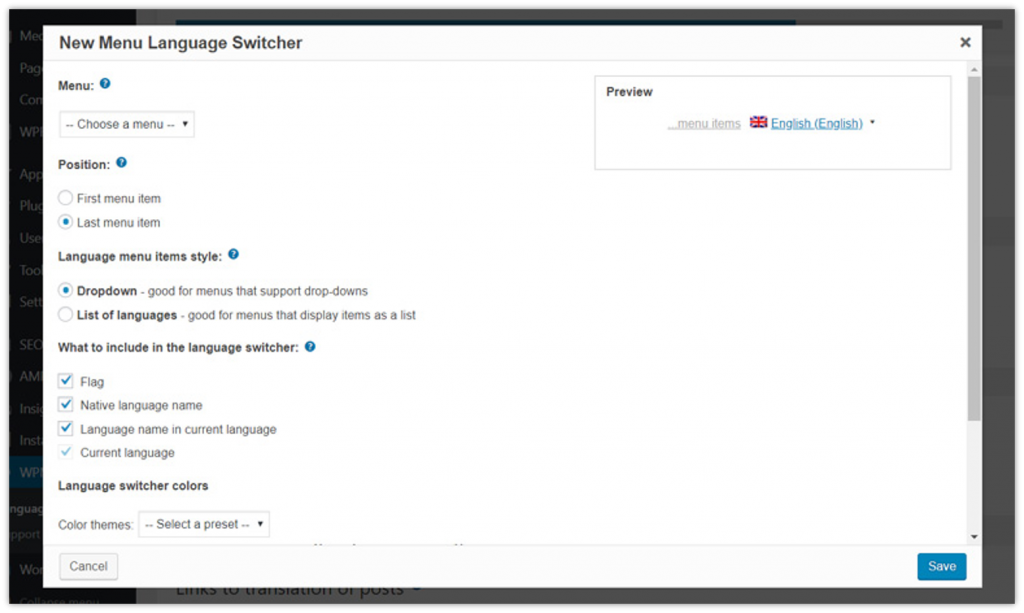
After configuring all the options there, you can see the preview of your New Menu Language Switcher. If everything looks fine, click Save.
Note: In the same way, you can add a language switcher to the widget area. But if you want to add the language switcher option only to the navigation menu, click Next.
Registering WordPress Multilingual Plugin
The final step would be registering your WPML plugin. Enter the site key that you have received from WPML. Then click Register.
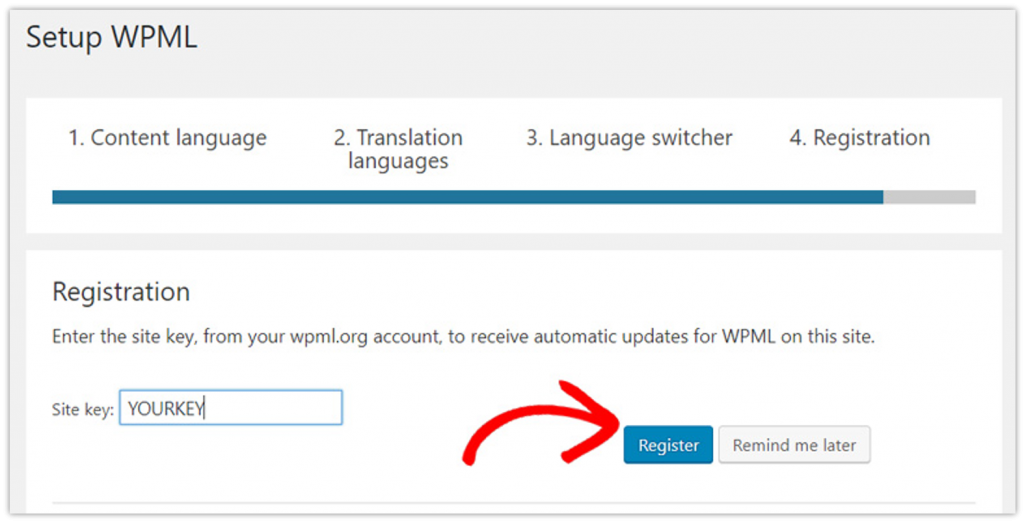
This will complete the WPML configuration process on your WordPress website.
Add Multilingual Content for Posts & Pages
After configuring the WPML plugin, you can now add multilingual content to your website. The WordPress Multilingual plugin can translate the posts, pages, tags, categories as well as themes in to any desired language.
Step 1: To create multilingual content for any of your existing posts, go to Posts > All Posts. You can see the total number of posts, and also the number of posts per language.
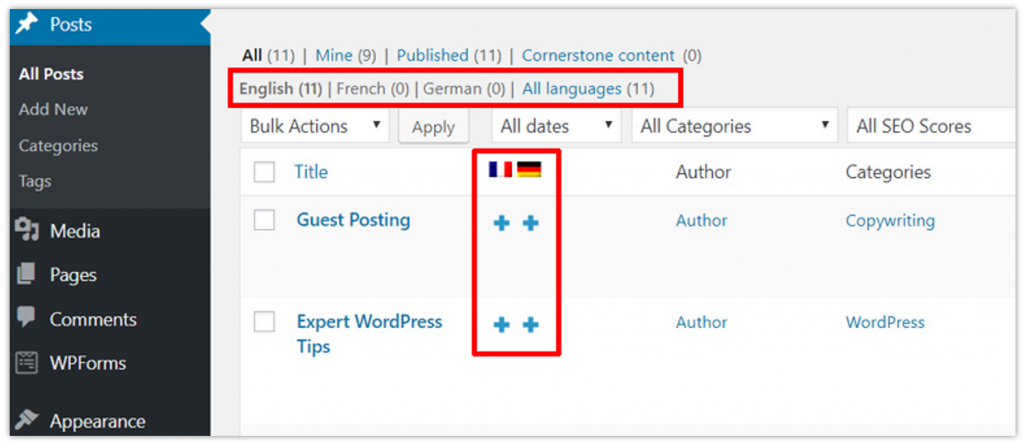
WordPress can automatically detect the primary language of your website. Next to your posts, you can see the Addition icons for each language you have selected earlier during the configuration process. Click the Addition icon under a language into which you want to translate your post.
Step 2: Let’s suppose you click the Addition icon under the French language. This will open the post editor. On top of the editor, you will see the language name/flag. Also, you will see the Language box on the right side of the post editor. Right underneath it, you will see the language name.
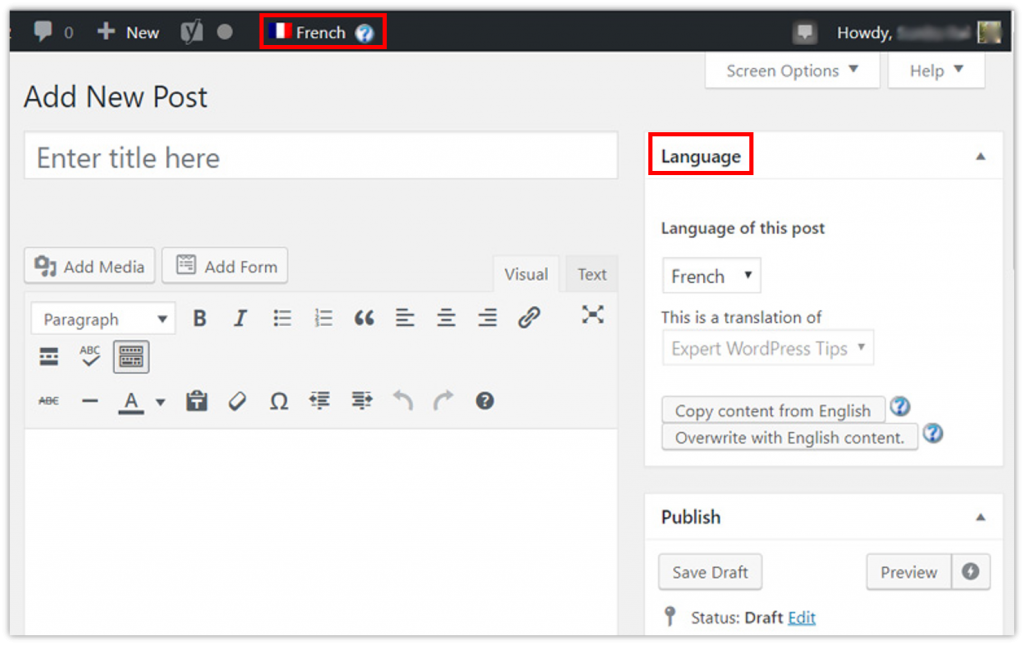
Step 3: Inside the post area, you need to add the translated content. After that, you can publish the post.
Note: In case you do not have proficiency in that particular language, you can add users/authors to your website for translating the web content.
Add Multilingual Content for Categories & Tags
The WordPress Multilingual plugin can also translate your site categories, tags, or other custom taxonomies in any desired language.
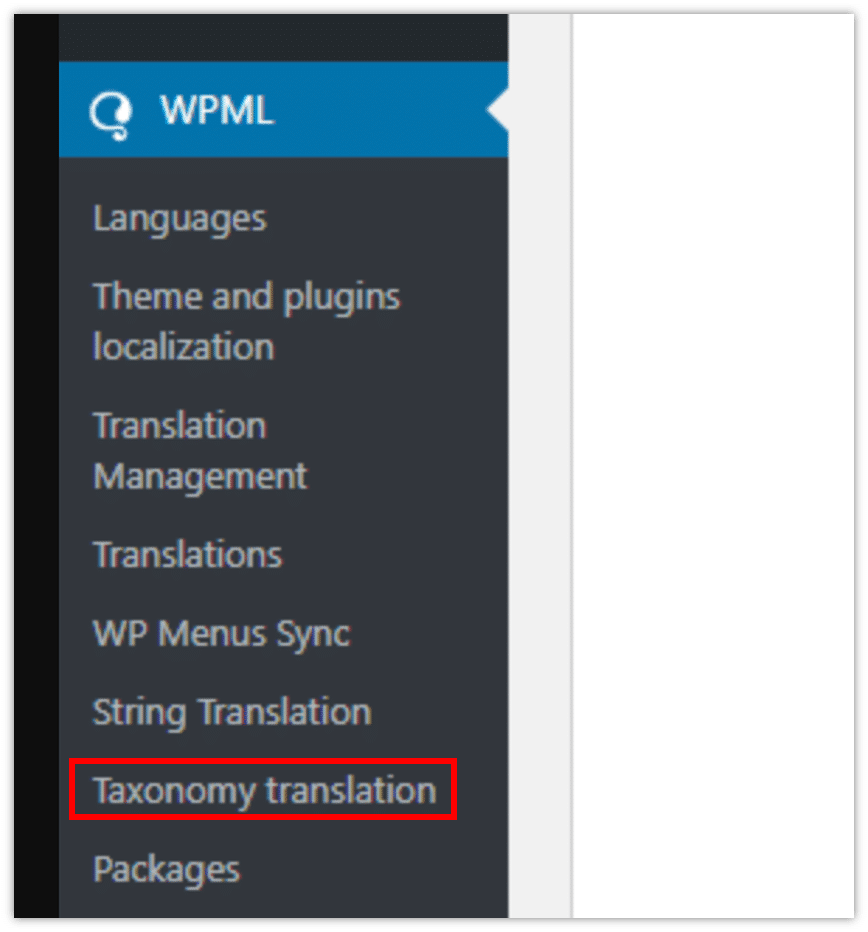
Step 1: To translate categories, tags, and other taxonomies, go to your WordPress dashboard. On the dashboard menu, click WPML > Taxonomy translation.
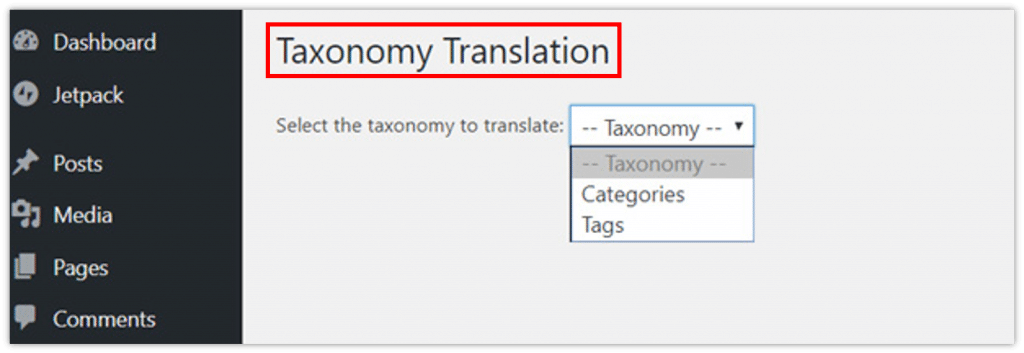
Step 2: Under Taxonomy Translation, select the taxonomy you want to translate.
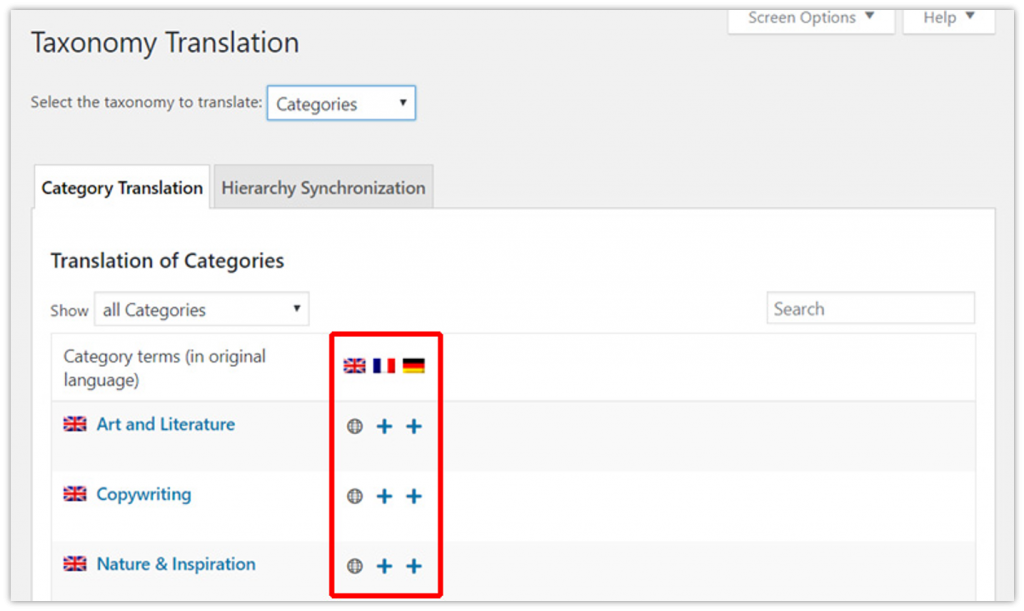
Step 3: Let’s suppose you select Categories. This will load all the categories of your website on the Category Translation tab. You will see the Addition icon next to your taxonomy terms. Click the Addition icon under a language/flag to translate the taxonomy.
Add Translations for Navigation Menus
Step 1: To translate your site navigation menus, click Appearance > Menus on your WordPress dashboard. Then select the menu that you want to translate into your desired language.
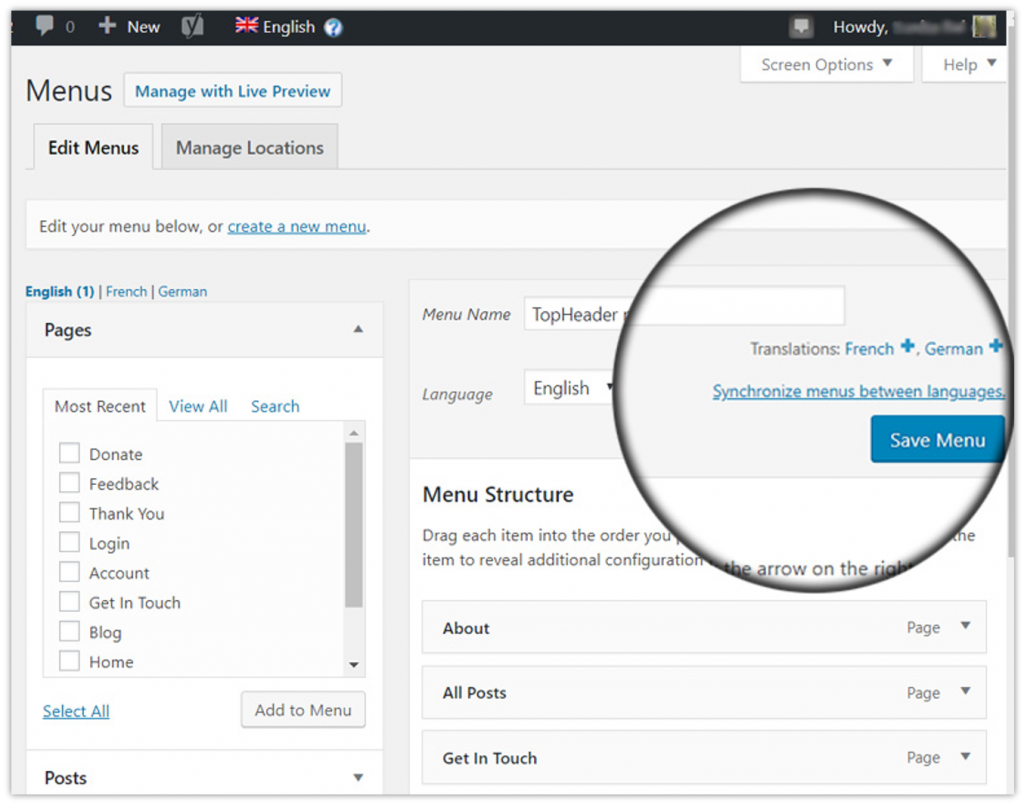
You will see the Addition icon for your website menu. Click the Addition icon next to the desired language to translate the menu.
Step 2: After creating a translation for the navigation menu, you will need to add that menu item as in your primary language navigation menu.
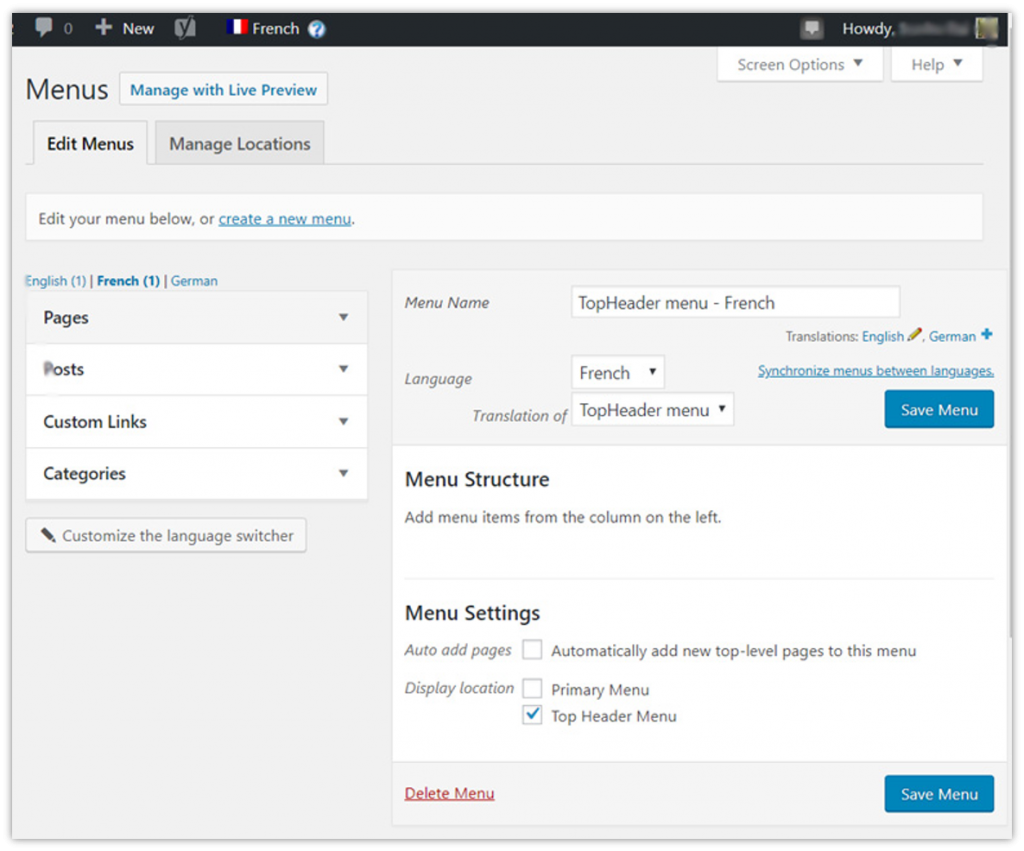
In case you have posts, pages, and categories as your navigation menu items, you need to translate them as shown in this section – Add Multilingual Content for Posts & Pages. And then you can add them from the tabs on the left of the Edit Menu screen. Once everything is done, click Save Menu.
Translate Themes & Plugins
With the WordPress Multilingual plugin, you can also translate your WordPress themes and other plugins.
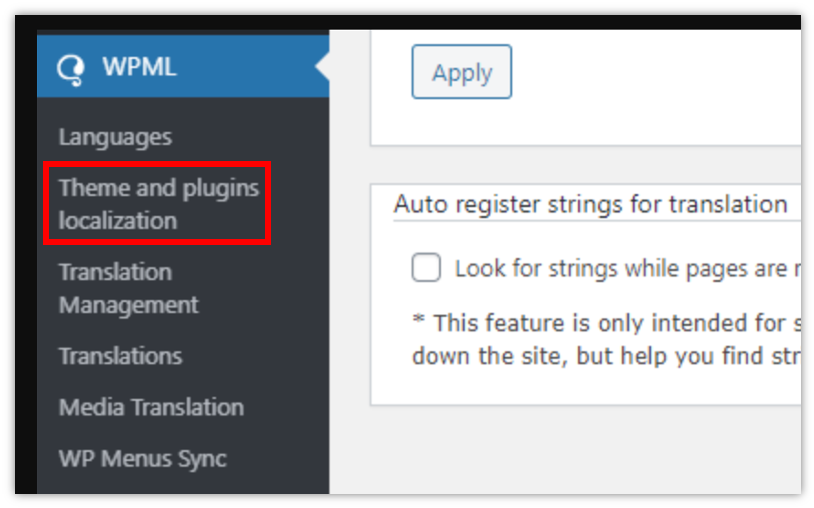
Step 1: To translate them, go to your WordPress dashboard. On the dashboard menu, click WPML > Themes and plugins localization.
Step 2: Under Theme and plugins localization, you need to select how you want to use the translate strings in the themes and plugins.
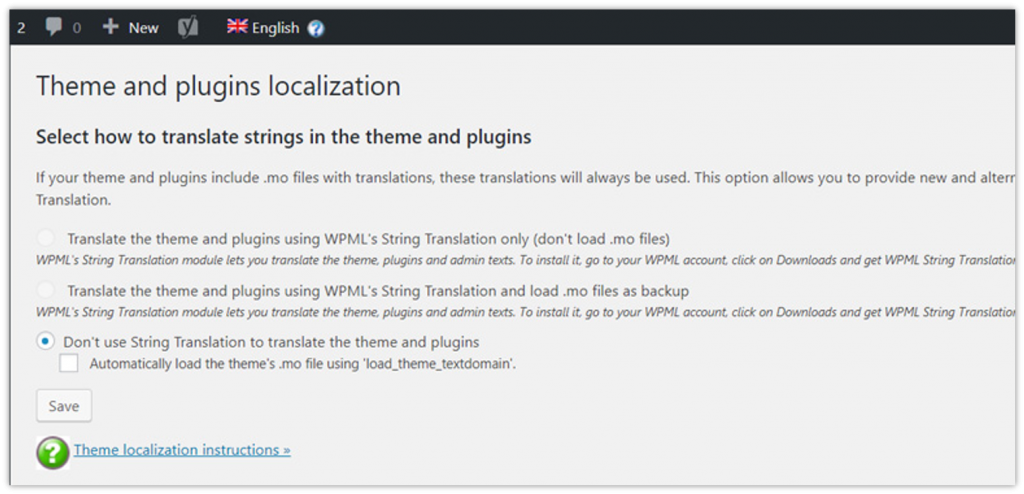
The option “Don’t use String Translation to translate the theme and plugins” is checked by default. You can keep it checked if there are some translation files available for your WordPress theme. Please note that it only works with the official WordPress themes.
The WPML plugin comes with a WPML String Translation Module to translate your theme and plugins properly. By using this module, you can translate custom fields, widgets, and other text on your website.
Conclusion
The article has nicely explained the WPML plugin and how to use it to create a multilingual website in WordPress. If you use the WordPress Multilingual plugin, there is no need to seek professional help.
Also, check out Top 5 WordPress Translation Plugins for Your Business Website.


