The Google Font library is a place where you can find some best web fonts for your WordPress site. For those who do not know how to add Google fonts to WordPress, we have come up with this tutorial. In this article, we will discuss two different ways to import Google fonts into a WordPress site. After reading this article, you will be able to import Google fonts into your WordPress site without requiring any help.
Import Google Fonts into WordPress
There are hundreds of web fonts available in the Google Font library. All the Google fonts are highly compatible with WordPress, no matter which WordPress version you are using. When you visit the Google font library, you might get confused because there are too many font options. If you are not sure which Google font you should choose, refer to this article – Best Google Fonts for Your WordPress Site. Once you choose the right Google font for your WordPress site, you have to import that font into your WordPress site. Many WordPress beginners may not know how to import Google fonts into a WordPress site. Well, there are two easy ways to do that –
- Add code directly into your WordPress theme
- Use this WordPress plugin – Easy Google Fonts
Add Code into your WordPress Theme
This is a manual method, i.e. does not rely on a plugin. If you do not want to use any plugin, you should use this method. However, this method will require you to have some prior coding knowledge. Because here you need to add the code directly into your WordPress theme. If you are a beginner, you may find it a bit challenging to do it by yourself. But do not worry! We will help you. Just follow the steps given below –
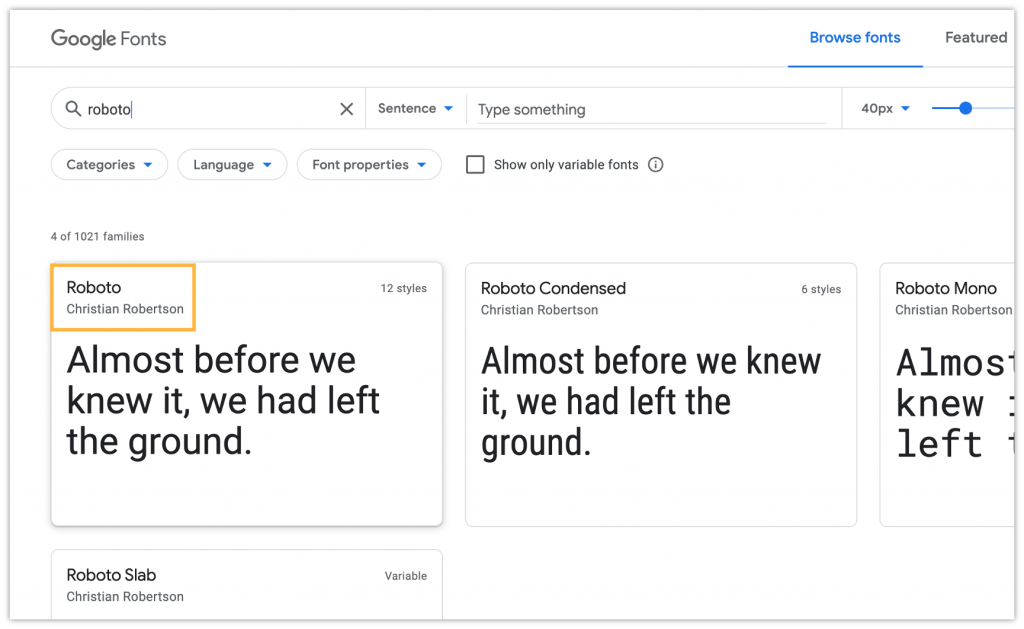
Step 1: First, go to the Google Fonts library. Then search the Google font you want to import into your WordPress site. For example, you want to add Roboto from Christian Robertson. Simply enter Roboto in the search bar, and then click Roboto in the search results.

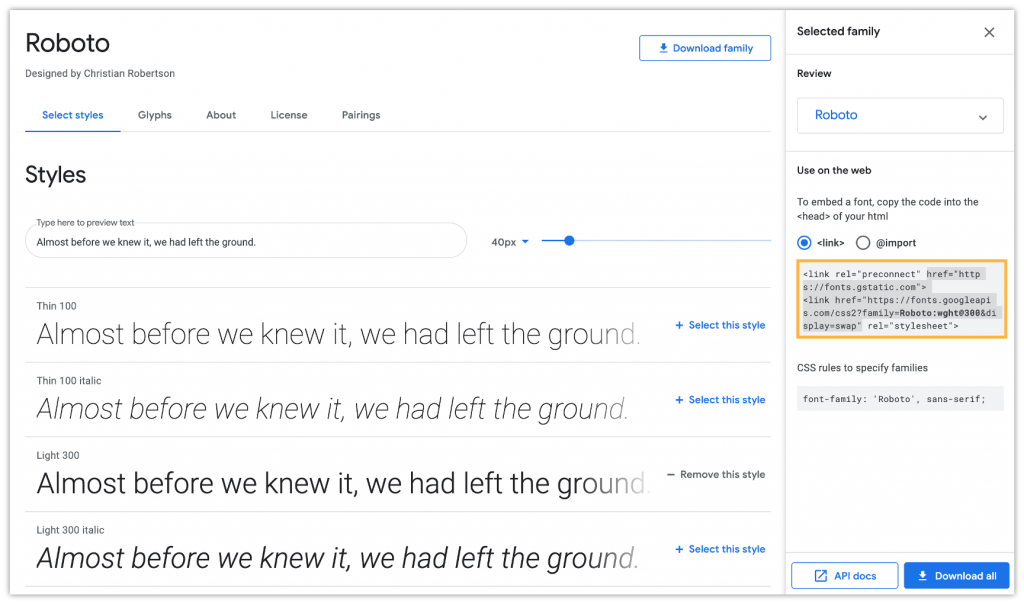
Step 2: This will take you to the main screen of the Robot font. You will see all the available styles there. Now choose the font style you want to use, and click + Select this style.

Step 3: You embed the selected font style, you need to copy the code into the header of your HTML. First, copy the code (highlighted in the screenshot).

Step 4: Then go to your header.php file, open it, and paste the code (the one you copied in the earlier step) above your main stylesheet. Save the header.php file
Step 5: After that, you can start using it in your CSS file.
CSS rules to specify families
font-family: ‘Roboto’, sans-serif;
Use “Easy Google Fonts” Plugin
If you are looking for an easy way to import Google fonts into your WordPress site, you should consider using the WordPress plugin – Easy Google Fonts. It has over 600 Google fonts along with the font variants to choose from. This method does not require any coding knowledge. You just need to install the plugin, and you are all set to import Google fonts.

With over 300k active installations, Easy Google Fonts is one of the best and highly recommended WordPress font plugins. Using this plugin, you can easily add Google fonts to any WordPress theme without requiring any prior coding knowledge. The Easy Google Fonts plugin is highly compatible with all WordPress themes (free and premium ones). It works very well with the WordPress customizer so that you can check the preview of the Google fonts on your site while adding them.
How to Use Easy Google Fonts Plugin?
The Easy Google Fonts plugin is very easy to use. But before you can start using this WordPress plugin, you need to install it. Follow the simple steps given below –
- First, log into your WordPress site to go to its admin dashboard. On the WordPress dashboard, click Plugins > Add New.
- On the Add Plugins screen, enter Easy Google Fonts in the search bar.
- You will see the Easy Google Fonts plugin in the search results. Click Install Now.
- After installing the plugin, you need to activate it. To do that, click Activate.
After installing and activating the plugin, it is ready to use. Follow the simple steps given below –
- On the WordPress dashboard, click Appearance > Customize. This will take you to the WordPress customizer page.
- On the WordPress customizer page, you will notice a newly added menu item called Typography. Click it.
- You can control the fonts by the sections of the page. The sections include – Paragraphs, H1, H2, H3, H4, H6, and H6. Whatever changes (related to typography) you make, you can see the live preview.
Note: The process is quite lengthy to explain so we are sharing this video tutorial from WPLearningLab. Watch this comprehensive video to understand how to use the Easy Google Fonts plugin to import Google fonts into a WordPress site. You can also refer to this article – Easy Google Fonts: Customize Fonts on WordPress.
Conclusion
Google fonts will give your web content more professional look. Besides, they load faster so it is good for your site’s user experience. We hope the article has helped you learn how to import Google fonts into your WordPress. You do not need to take help from any web designer. There are two methods shared in the article. Whichever seems good, you can use that.


