Creating content is an exciting journey for any blogger or website owner. The thrill of crafting a piece that resonates with your audience and the anticipation of hitting that ‘publish’ button can be exhilarating. However, before your content goes live, it often starts as a draft. Draft pages in WordPress are a crucial part of the content creation process. They allow you to perfect your work, make necessary edits, and ensure everything is in place before the world sees it. In this guide, we’ll walk you through the steps of “WordPress how to publish my draft pages,” ensuring your content makes a seamless transition from draft to published post.
Step-by-Step Guide to Publish Draft Pages in WordPress

To effectively manage your content, understanding “WordPress how to publish my draft pages” is essential. Here’s a detailed step-by-step guide:
- Log in to Your WordPress Dashboard
- Start by logging into your WordPress dashboard. This is your main control panel where you manage all your website’s content and settings.
- Navigate to the Pages Section
- In the left-hand menu, click on ‘Pages’ to view a list of all your pages, including drafts.
- Locate Your Draft Page
- Find the draft page you want to publish. Draft pages will be clearly marked.
- Edit Your Draft Page
- Click on the title of the draft page to open it in the editor. Here, you can make any final changes or updates.
- Preview Your Page
- Before publishing, preview your page to ensure everything looks good. Click on the ‘Preview’ button, which is at the top right corner of the editor.
- Publish Your Draft Page
- Once you’re satisfied with your draft, it’s time to publish. Click the ‘Publish’ button. You may need to confirm your choice, as WordPress will ask if you’re ready to publish.
- Confirm and Go Live
- Confirm that you want to publish the page. Your draft page is now live on your website.
Benefits of Using Draft Pages
Understanding “WordPress how to publish my draft pages” not only helps in managing your content but also ensures that you maintain a high standard of quality. Draft pages offer several benefits:
- Allows for Thorough Review
- Drafting your content first allows you to review and refine it before it goes live, ensuring that your audience gets the best version.
- Facilitates Collaboration
- If you work with a team, draft pages make it easier to collaborate. Team members can add comments, suggestions, and edits.
- Prevents Publishing Errors
- Working with drafts helps prevent accidental publishing, giving you the control to decide when your content is ready.
Common Issues When Publishing Draft Pages
When working on “WordPress how to publish my draft pages,” you might encounter some common issues. Here are a few issues and how to resolve them:
- Draft Not Saving
- Ensure that your internet connection is stable and that you’re not facing any server issues. Regularly save your draft to avoid losing progress.
- Publishing Button Not Visible
- If the publish button is not visible, check if you have the necessary permissions. You might need administrator or editor rights to publish pages.
- Formatting Issues
- Sometimes, the formatting in the draft might not look the same once published. Preview your page and adjust formatting as needed before publishing.
Publishing draft pages in WordPress is a straightforward process that ensures your content is polished and ready for your audience. By following the steps outlined in this guide on “WordPress how to publish my draft pages,” you can confidently move your drafts to published posts, enhancing your website’s content quality and professionalism. Happy publishing!
Finding Your Draft Pages

Step 1: Accessing the WordPress Dashboard
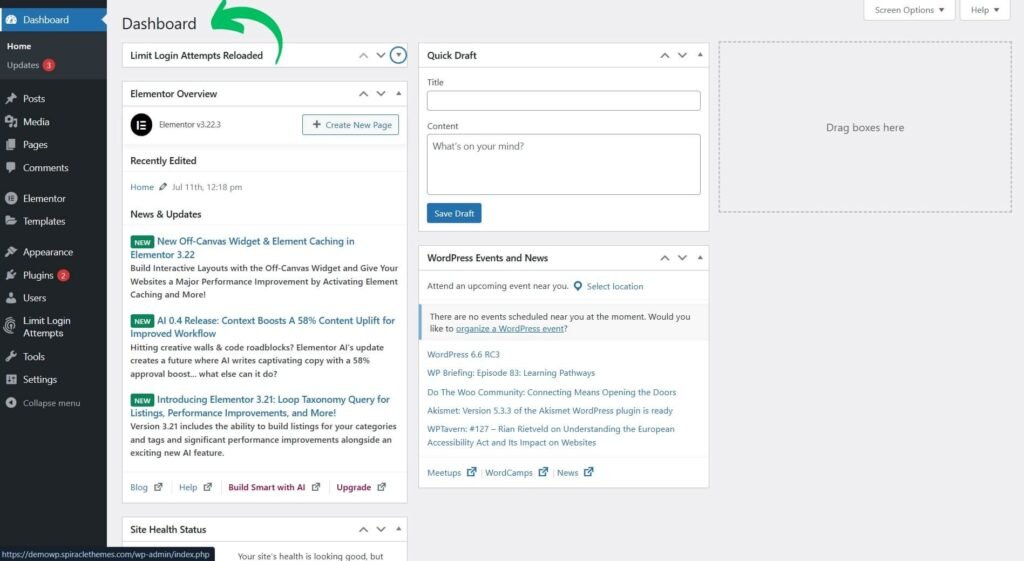
To begin the process of publishing your drafts, you first need to access your WordPress dashboard. This is the control center for your website where you can manage all aspects of your content and settings. Here’s how you can do it:
- Firstly Open your web browser on your device and then go to your WordPress login page. Typically, this can be accessed by adding /wp-admin to the end of your website’s URL (e.g., www.yourwebsite.com/wp-admin).
- Enter your username and password to log in. Once logged in, you will be directed to the WordPress dashboard, your main control panel.
Step 2: Locating the Pages Menu
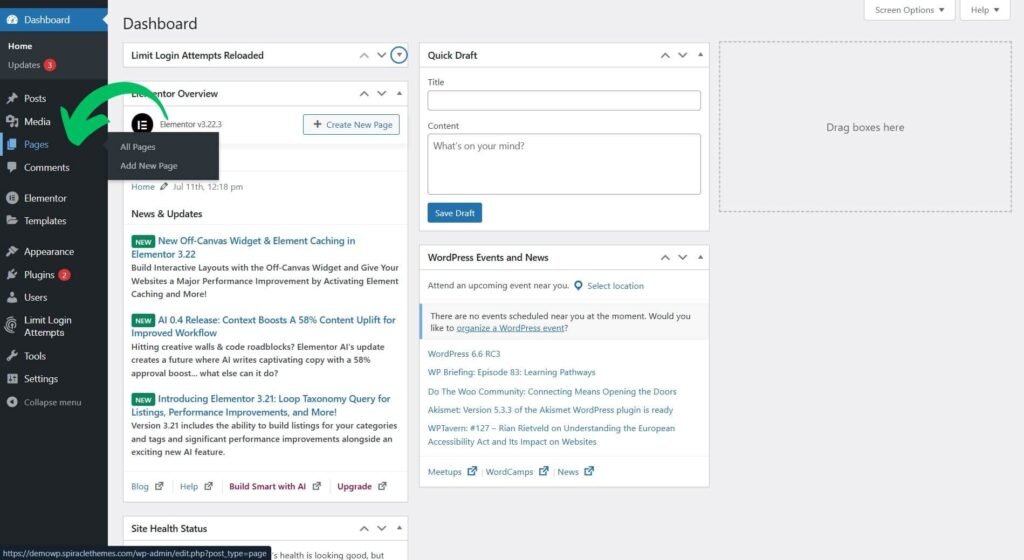
Once you’re in the WordPress dashboard, the next step is to locate the Pages menu. This is where all your pages, including drafts, are listed. Follow these steps:
- In the left-hand sidebar of the dashboard, you will see various menu items.
- Click on the ‘Pages’ menu. This will expand to show options such as ‘All Pages’, ‘Add New’, etc.
- Click on ‘All Pages’ to view the list of all pages on your website.
Step 3: Identifying Draft Statuses within the Pages List
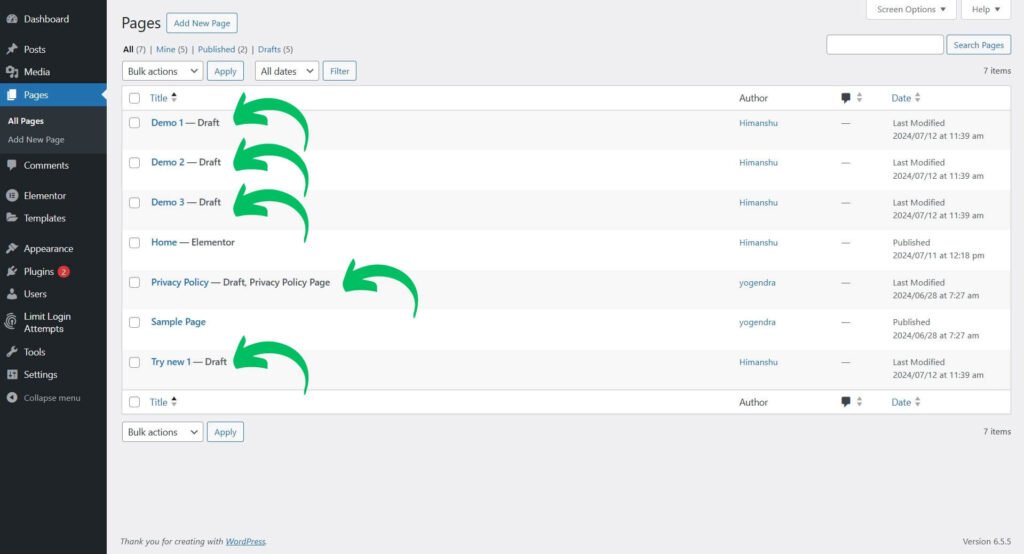
Now that you are in the ‘All Pages’ section, you need to identify which of your pages are drafts. Identifying the draft statuses within the pages list is crucial for “WordPress how to publish my draft pages”. Here’s how you can do it:
- Draft Label:
- In the ‘All Pages’ list, each page will have a status label. Draft pages will be marked with a ‘Draft’ label next to the title. This label makes it easy to distinguish drafts from published pages.
- Filter by Drafts:
- At the top of the pages list, you may see links such as ‘All’, ‘Published’, ‘Drafts’, etc. Clicking on ‘Drafts’ will filter the list to show only the draft pages, making it easier to find the specific draft you want to publish.
- Sort by Status:
- If you have a large number of pages, you can sort them by status. Look for a column header labeled ‘Status’ and click on it to sort the pages by their status, grouping all drafts together.
Why Identifying Drafts is Important
Understanding the draft statuses is a key part of “WordPress how to publish my draft pages”. It ensures you can quickly find and manage your drafts, making the process of publishing them more efficient. By clearly identifying drafts, you can:
- Organize Your Workflow:
- Keep track of which pages are still in progress and which are ready to be published, streamlining your content management.
- Avoid Mistakes:
- Ensure you don’t accidentally publish a page that’s not ready or overlook a draft that needs attention.
- Enhance Collaboration:
- If you’re working with a team, clearly marked drafts help team members know which pages require review or completion before publication.
By following these steps to access your dashboard, locate the Pages menu, and identify draft statuses, you can efficiently manage and publish your draft pages. This comprehensive understanding of “WordPress how to publish my draft pages” will help you maintain a smooth and organized workflow, ensuring your content is always at its best before going live.
Publishing Your Drafts

Publishing this draft ensures your blog post is comprehensive, engaging, and SEO-optimized. It delivers well-researched, reader-friendly content with a clear structure and professional tone, tailored to your audience’s needs. Save time and enhance your site’s credibility with actionable insights that add real value for your readers. Mastering WordPress how to publish my draft pages becomes effortless, empowering you to consistently deliver fresh, high-quality content.
Step 1: Selecting the Draft Page You Want to Publish
After identifying your draft pages, the next step in “WordPress how to publish my draft pages” is to select the specific draft you want to publish. Here’s how you can do it:
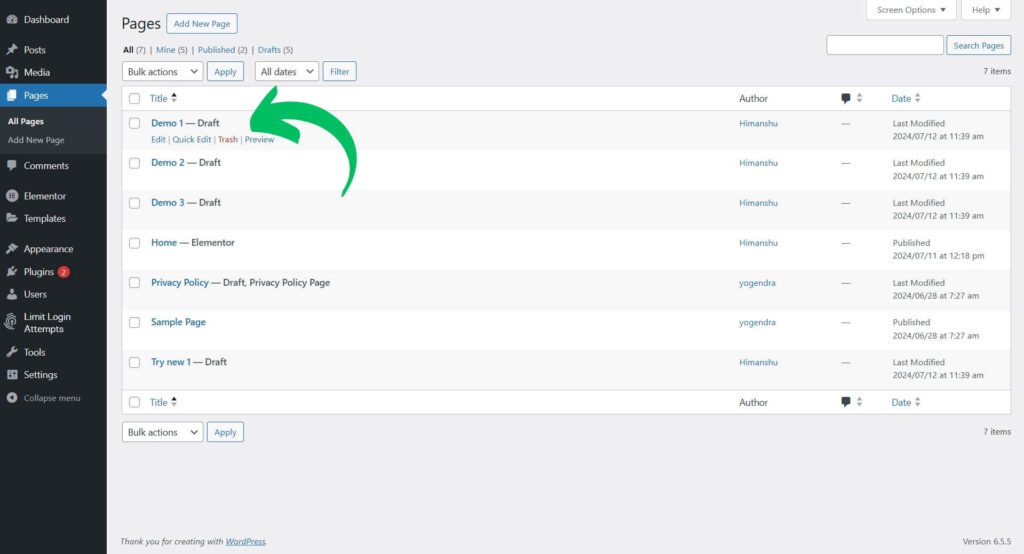
- In the ‘All Pages’ section of your WordPress dashboard, locate the draft page you want to publish. As mentioned earlier, draft pages will have a ‘Draft’ label next to their title.
- Click on the title of the draft page. This action will open the page in the WordPress editor, where you can make any final adjustments or edits before publishing.
Step 2: Utilizing the Publish Button and its Options
With your draft page open in the editor, you’re ready to publish it. WordPress offers several options for publishing, allowing you to either publish immediately or schedule the publication for a later date. Understanding these options is key to mastering “WordPress how to publish my draft pages”.
The Simple Publish Action
The simplest way to publish your draft page is to use the ‘Publish’ button. Here’s how you can do it:
- Review Your Draft:
- Before you publish, review your draft to ensure that all content is accurate and formatted correctly. Use the ‘Preview’ button to see how the page will look once it’s live.
- Click the Publish Button:
- In the right-hand sidebar of the editor, you will see a ‘Publish’ button. Click on this button to publish your draft immediately.
- Confirm Your Choice:
- WordPress will prompt you to confirm that you want to publish the page. Confirm your choice, and your draft page will go live on your website.
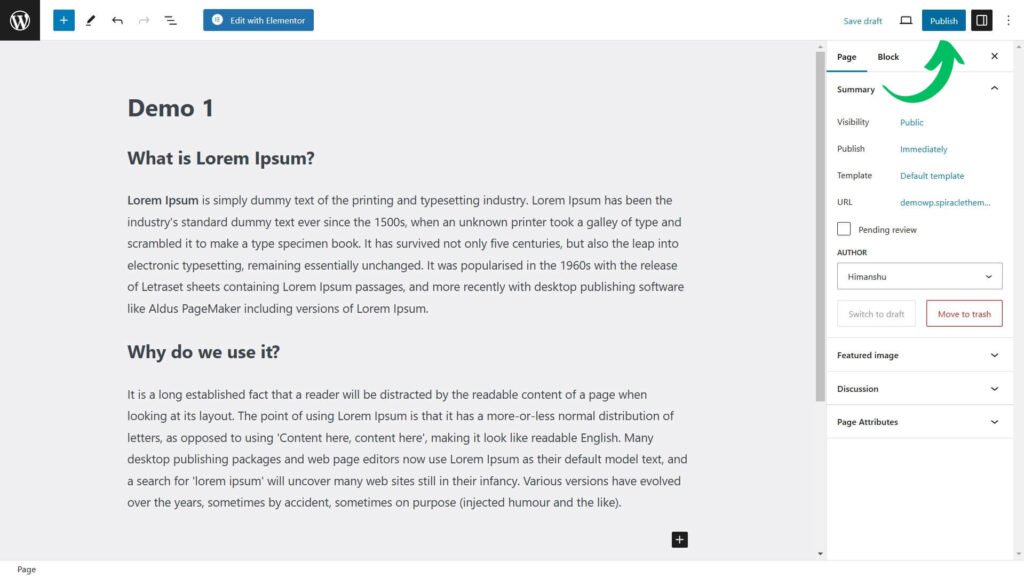
Using this simple publish action is the most direct method in “WordPress how to publish my draft pages”, allowing you to quickly make your content available to your audience.
Step 3: Scheduling Your Draft for Later Publication
If you prefer to schedule your draft to be published at a later date or time, WordPress provides a scheduling option. This can be useful for planning content ahead of time. Here’s how you can schedule your draft:
- Open the Draft Page:
- Just like the simple publish action, start by opening your draft page in the WordPress editor.
- Access the Publish Settings:
- In the right-hand sidebar, under the ‘Publish’ section, look for the ‘Publish immediately’ option. Click on the ‘Edit’ link next to it.
- Set the Date and Time:
- A date and time picker will appear. Set the desired date and time for when you want your draft to be published. This allows you to plan and schedule your content release according to your editorial calendar.
- Click Schedule:
- After setting the date and time, the ‘Publish’ button will change to ‘Schedule’. Click the ‘Schedule’ button to finalize your scheduling.
- Confirm Your Choice:
- WordPress will confirm that your draft is scheduled for publication at the specified date and time.
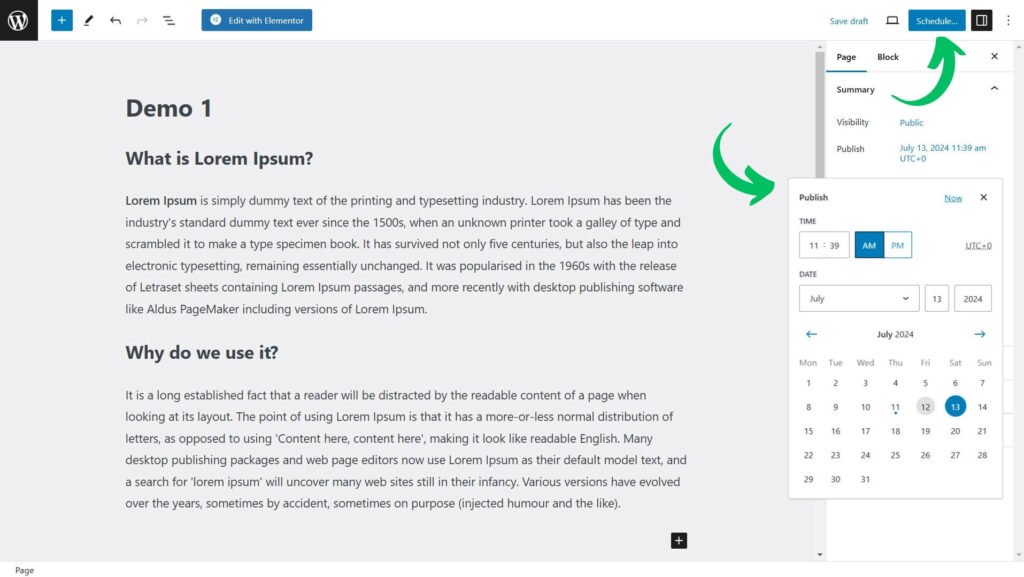
Scheduling drafts is an advanced feature in “WordPress how to publish my draft pages” that gives you greater control over your content release, ensuring that your audience receives new content consistently.
Mastering “WordPress how to publish my draft pages” involves understanding both the simple publish action and the more advanced scheduling options. By following these steps, you can efficiently manage your draft pages, ensuring they go live exactly when you want them to. Whether you choose to publish immediately or schedule for later, WordPress makes it easy to keep your content organized and timely. Happy publishing!
Additional Considerations

Once you’ve drafted your content and are ready to publish, ensuring your post is polished and impactful involves several key steps:
Double-Checking Your Content (Proofreading)
Proofreading is essential before hitting the “WordPress how to publish my draft pages” button to ensure your content is error-free and polished. Here’s a detailed approach:
- Read Aloud: Reading your content aloud helps identify awkward phrasing, missing words, or grammatical errors that may have been overlooked when reading silently.
- Use Spell Check: Utilize the built-in spell check feature in WordPress or your preferred text editor to catch common spelling errors. It highlights misspelled words and offers suggested corrections.
- Check Formatting: Ensure consistency in formatting throughout your post. Verify that headings, paragraphs, lists, and other elements are correctly formatted for readability and visual appeal.
- Review for Clarity: Assess your content for clarity and coherence. Ensure that ideas flow logically and that your message is effectively communicated to your audience.
Previewing Your Page Before Publishing
Previewing your page allows you to see exactly how your “WordPress how to publish my draft pages” content will appear to your readers before it goes live. Here’s why it’s crucial:
- Check Layout: Verify that the layout of your content is visually pleasing and organized. Ensure that images, text alignment, and spacing are as intended.
- Test Links: Click on all internal and external links within your content to confirm they lead to the correct pages or resources. Broken links can negatively impact user experience and SEO.
- Mobile-Friendly Check: Preview your page on different devices (desktop, tablet, and mobile) to ensure it displays properly across all screen sizes. Mobile responsiveness is crucial as more users access websites via mobile devices.
- Check Browser Compatibility: Test your page in various web browsers (Chrome, Firefox, Safari, etc.) to ensure consistent rendering and functionality across different platforms.
Setting Featured Images (if applicable)
A featured image is the visual representation of your post that appears alongside the title when shared on social media platforms or displayed in lists of posts. Here’s how to optimize it:
- Visual Appeal: Choose a high-quality image that captures the essence of your content and attracts readers’ attention. Avoid images that are too busy or unrelated to your topic.
- Enhance Branding: Use consistent branding elements such as colors, fonts, or logos in your featured images to strengthen brand identity and recognition.
- SEO Optimization: Add descriptive alt text to your featured image. This text helps search engines understand the content of the image and can improve your post’s SEO.
To set a featured image in “WordPress how to publish my draft pages”:
- Navigate to Post Editor: Open your post in the WordPress editor where you are preparing to publish your content.
- Access Featured Image Settings: Look for the ‘Featured Image’ box usually located in the right-hand sidebar of the editor screen.
- Upload or Select Image: Click on ‘Set featured image’ and choose an image from your media library or upload a new image from your computer.
- Add Alt Text: Enter a brief, descriptive alt text for accessibility purposes and SEO benefits. Describe the image content concisely.
- Set Featured Image: Click the ‘Set featured image’ button to save your selection and close the featured image settings.
These additional considerations are vital in ensuring that your “WordPress how to publish my draft pages” published content meets high standards of quality and engagement. By meticulously proofreading, previewing your page for layout and functionality, and optimizing with a featured image, you enhance the professionalism and impact of your posts. Incorporating these steps into your publishing process demonstrates your commitment to delivering valuable and polished content to your audience.
Conclusion
Publishing your draft pages in WordPress is a straightforward process that empowers you to share your ideas with the world effortlessly. By mastering “WordPress how to publish my draft pages”, you unlock the potential to reach and engage your audience effectively. Here’s a recap of why this process is beneficial and an encouragement for your ongoing content creation journey:
Ease of Publishing Draft Pages
Publishing draft pages in WordPress is designed to be user-friendly and intuitive. With simple steps like selecting your draft, using the publish button, or scheduling for later, you can quickly transform your ideas into published content. This accessibility ensures that your content reaches your audience promptly, enhancing your website’s relevance and visibility.
Continued Content Creation
As you continue to create and publish content on WordPress, remember that each piece contributes to your website’s growth and audience engagement. Consistency in publishing not only strengthens your online presence but also establishes you as a reliable source in your niche. Embrace the journey of content creation, experiment with different topics and formats, and engage with your audience to build lasting connections.
Publish My Draft Pages
Mastering the process of “WordPress how to publish my draft pages” empowers you to manage your content effectively, optimize for search engines, and deliver value to your readers consistently. Whether you’re sharing insights, stories, or knowledge, each published draft page is a step forward in achieving your website’s goals.
Keep exploring, learning, and refining your content strategy on WordPress. Your dedication to quality and relevance will continue to resonate with your audience and drive the success of your website.
How do I find my draft pages in WordPress?
To find your draft pages:
- Go to the WordPress Dashboard.
- Navigate to Pages or Posts.
- Click on the Drafts tab to view all your draft content.
How can I publish a draft page?
To publish a draft page:
- Open the draft page by clicking on its title.
- In the Publish section on the right, click the Publish button.
- You can also set a specific publish date or time if needed.
Can I schedule a draft page to publish later?
Yes, you can schedule a draft page:
- Open the draft page and look for the Publish section.
- Click Edit next to Publish immediately.
- Set the desired date and time, then click OK and Schedule.
What if I want to save my changes but not publish yet?
Click the Save Draft button. This saves your changes without making the page visible to the public.
How do I review a draft before publishing it?
Preview the draft by clicking the Preview button in the Publish section. Review how the page will look and make any necessary adjustments before clicking Publish.


